TiDB
TiDB is an open-source, distributed relational database developed by PingCAP. It is a hybrid database product that supports both Online Transaction Processing (OLTP) and Online Analytical Processing (OLAP). After deploying the Agent, you can follow this tutorial to add TiDB as a data source in TapData, where it can be used as a source or target database to build data pipelines.
Supported Versions and Architectures
- Versions: Full data synchronization supports all versions, while incremental data synchronization supports versions 6.0.0 to 8.1.9.
- Architectures: Single-node or clustered architectures.
Supported Data Types
| Category | Data Types |
|---|---|
| Integer | BIGINT, BIGINT UNSIGNED, INT, INT UNSIGNED, INTEGER, SMALLINT, SMALLINT UNSIGNED, MEDIUMINT, MEDIUMINT UNSIGNED, TINYINT, TINYINT UNSIGNED |
| String | CHAR, VARCHAR, TEXT, TINYTEXT, MEDIUMTEXT, LONGTEXT, CLOB, ENUM, SET |
| Numeric | DECIMAL, DECIMAL UNSIGNED, FLOAT, DOUBLE, DOUBLE UNSIGNED, REAL (not supported for full sync) |
| Binary | BINARY, VARBINARY, BLOB, TINYBLOB, MEDIUMBLOB, LONGBLOB |
| Boolean | BOOLEAN, BIT |
| Date/Time | DATE, TIME, DATETIME, TIMESTAMP, YEAR |
| JSON | JSON |
SQL Operations for Sync
DML: INSERT, UPDATE, DELETE
tipWhen using TiDB as a target, you can select the write strategy through the advanced settings of the task node. In case of insert conflicts, you can choose to convert to an update or discard the record. In case of update failures, you can choose to convert to an insert or just log the issue.
DDL: ADD COLUMN, CHANGE COLUMN, DROP COLUMN, RENAME COLUMN
Incremental Sync Principle
To simplify the usage process, the TapData TiDB connector integrates with the TiFlow component (version 8.1.0), which parses change logs into ordered row-level changes. For more details, see the TiCDC Overview.
Considerations
To ensure proper data synchronization, the TiDB cluster and the TapData engine (Agent) must be within the same network and able to communicate properly.
When using TiDB as a source for incremental data synchronization, please check the following information:
Tables to be synchronized must have a primary key or unique index, where the values in the unique index column cannot be NULL and cannot be a virtual column.
To prevent TiCDC's garbage collection from affecting transaction or incremental data extraction, it is recommended to set the global garbage collection life time to 24 hours with the command
SET GLOBAL tidb_gc_life_time = '24h'.TapData engine must be deployed on an arm or amd system architecture.
Due to communication restrictions between TiDB components, when using the Tapdata Cloud product, the deployed Agent must be a semi-managed instance.
Prerequisites
Log in to the TiDB database and create a user account for data synchronization/transformation tasks using the following command:
CREATE USER 'username'@'host' IDENTIFIED BY 'password';- username: The username.
- host: Host that is allowed to log in, with
%representing any host. - password: The user's password.
Example: Create a user named
tapdatathat is allowed to log in from any host.CREATE USER 'tapdata'@'%' IDENTIFIED BY 'your_passwd';Grant permissions to the newly created user.
- As a Source
- As a Target
-- Permissions required for full + incremental sync
GRANT SELECT ON *.* TO 'username' IDENTIFIED BY 'password';
-- Grant permissions on a specific database
GRANT SELECT, INSERT, UPDATE, DELETE, ALTER, CREATE, DROP ON database_name.* TO 'username';

-- Grant permissions on all databases
GRANT SELECT, INSERT, UPDATE, DELETE, ALTER, CREATE, DROP ON *.* TO 'username';
- database_name: The database name.
- username: The username.
Connect to TiDB
In the left navigation bar, click Connections.
On the right side of the page, click Create.
In the pop-up dialog, search for and select TiDB.
On the redirected page, fill in the TiDB connection information according to the following instructions.
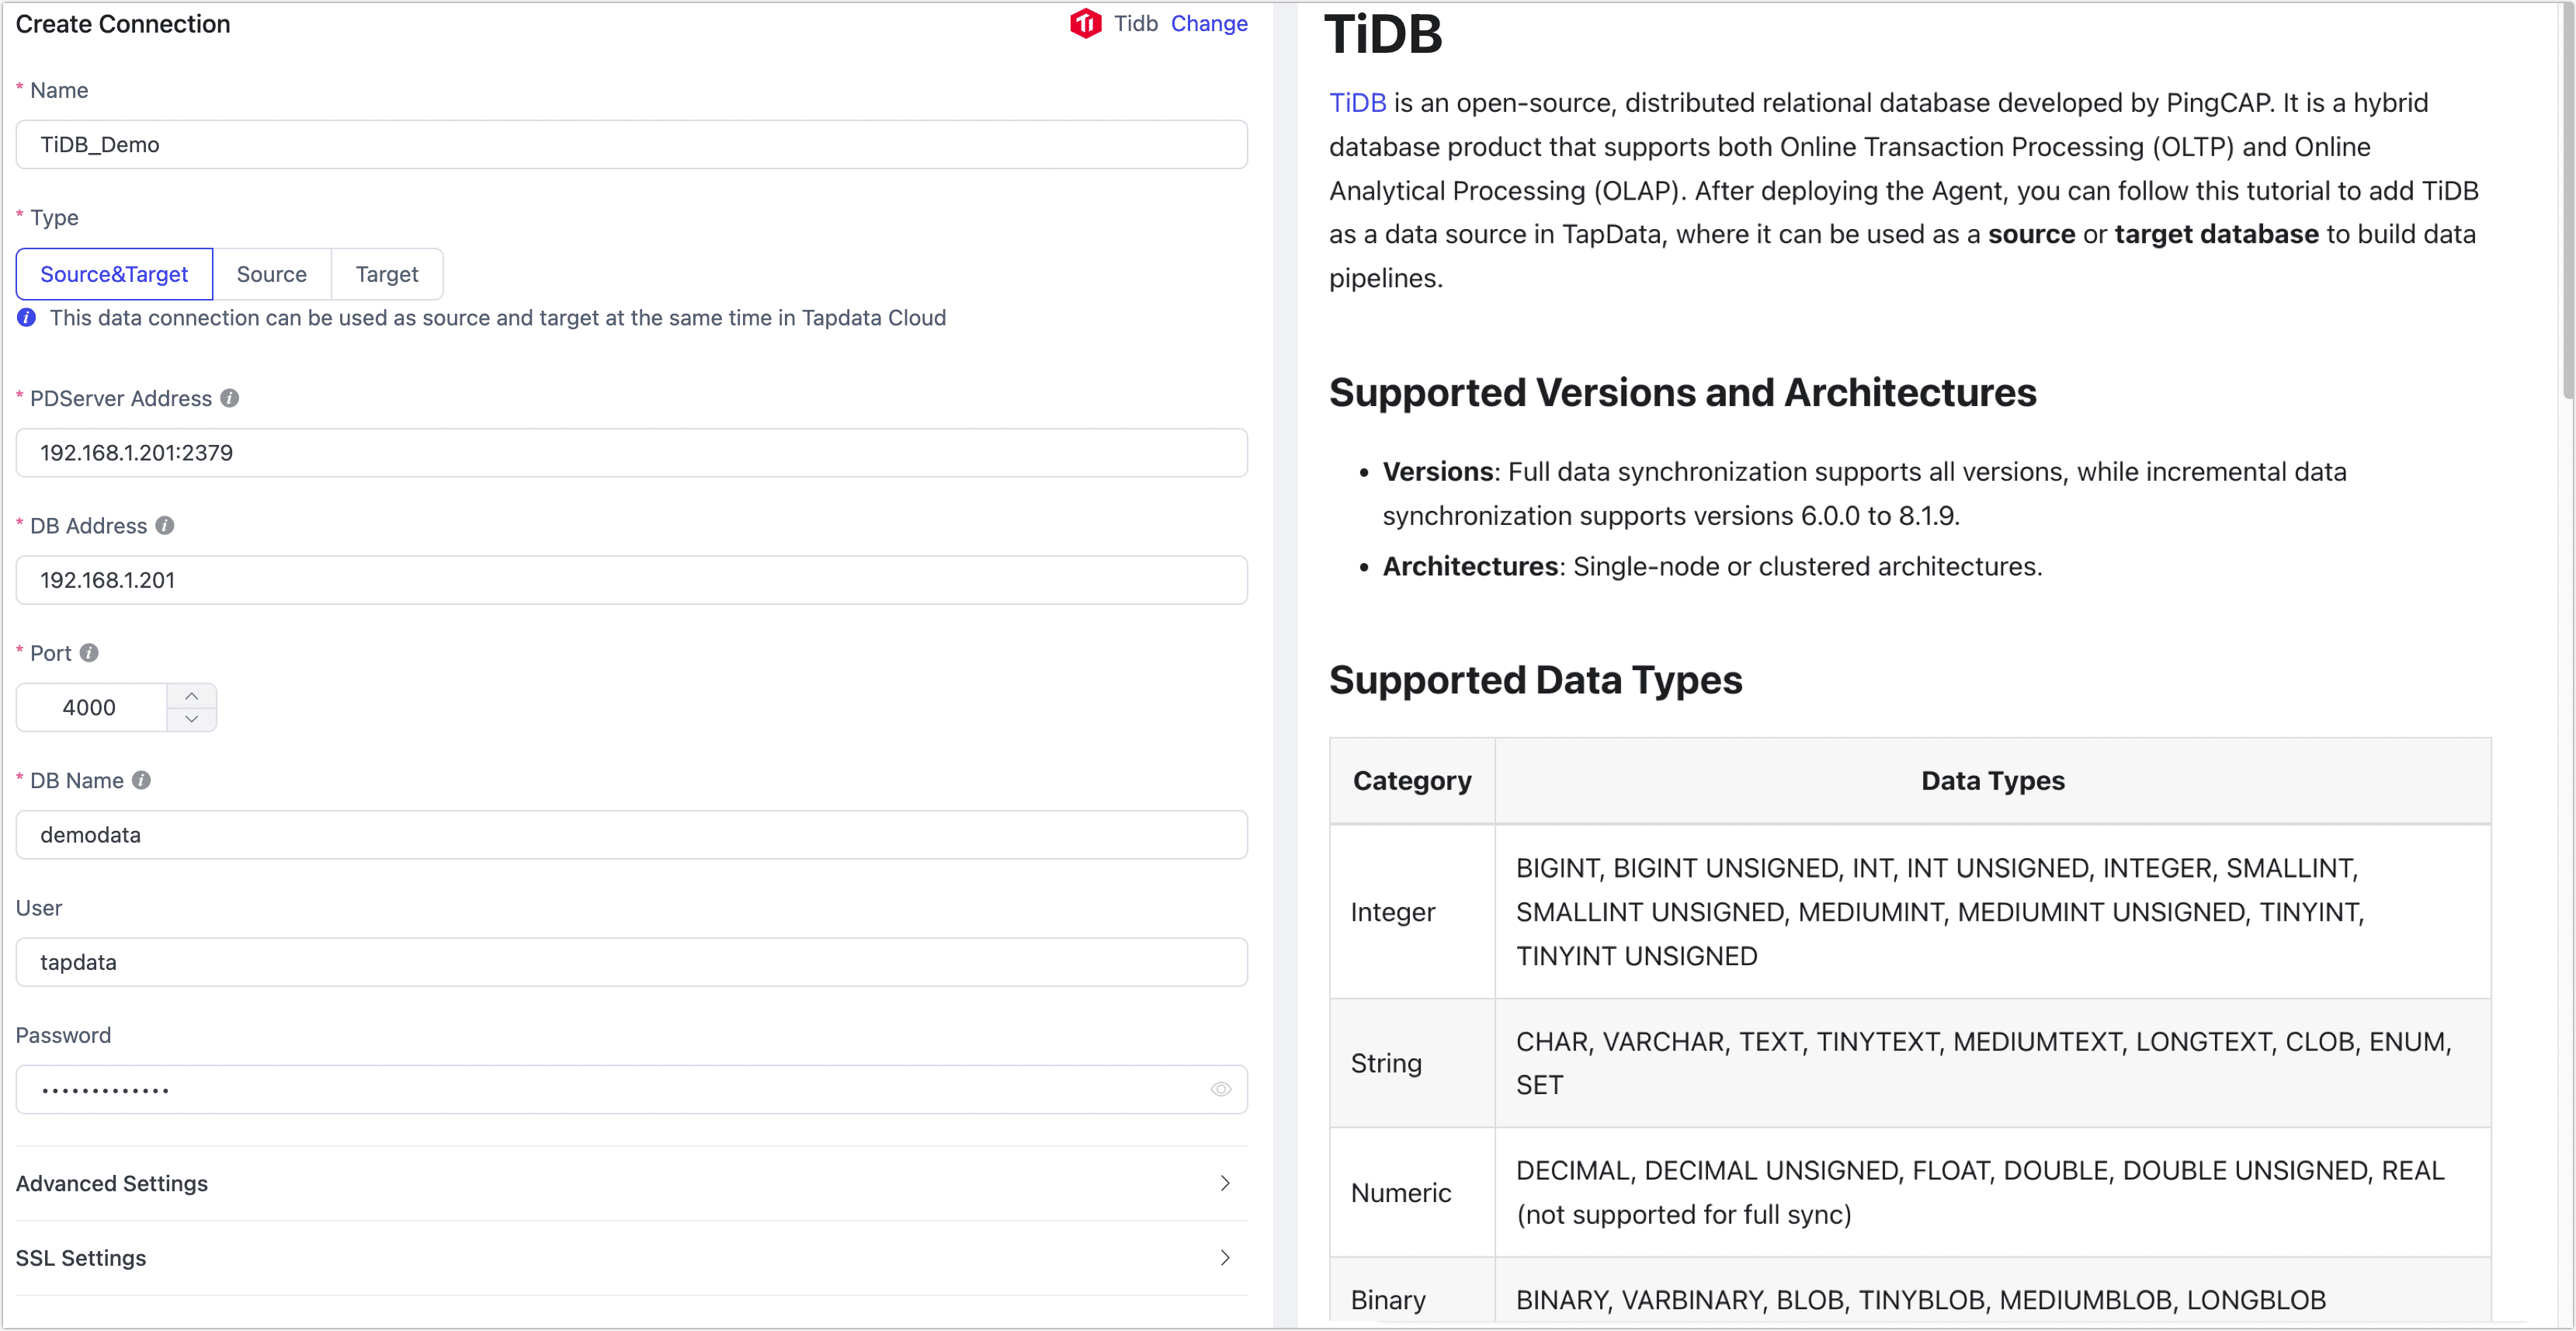
- Connection Settings
- Name: Enter a meaningful and unique name.
- Type: Supports using the TiDB database as a source or target.
- PD Server Address: Fill in the connection address and port of the PD Server. The default port is 2379. This parameter should be filled in only when using TiDB as a source with incremental data synchronization.
- DB Address: The address of the database.
- Port: The service port of the database, default is 4000.
- DB Name: The name of the database (case-sensitive). Each connection corresponds to a single database. If there are multiple databases, you need to create multiple data connections.
- Username, Password: The username and password for the database. For information on how to create and grant privileges, see the prerequisite.
- TiKV Port: The default port for TiKV, which serves as the storage layer for TiDB, providing data persistence, read-write services, and statistics data recording. The default port is 20160. This parameter should be filled in only when using TiDB as a source with incremental data synchronization.
- Advanced Settings
- Other Connection String Parameters: Additional connection parameters, which are empty by default.
- Timezone: The default time zone is 0 (UTC). If another time zone is configured, it may affect the synchronization of fields without time zone information (e.g.,
datetime). Fields with time zone information (e.g.,timestamp with time zone) anddateandtimetypes will not be affected. - CDC Log Caching: Mining the source database's incremental logs. This allows multiple tasks to share the same source database’s incremental log mining process, reducing duplicate reads and minimizing the impact of incremental synchronization on the source database. After enabling this feature, you will need to select an external storage to store the incremental log information.
- Contain Table: The default option is All, which includes all tables. Alternatively, you can select Custom and manually specify the desired tables by separating their names with commas (,).
- Exclude Tables: Once the switch is enabled, you have the option to specify tables to be excluded. You can do this by listing the table names separated by commas (,) in case there are multiple tables to be excluded.
- Agent Settings: Defaults to Platform automatic allocation, you can also manually specify an agent.
- Model Load Time: If there are less than 10,000 models in the data source, their schema will be updated every hour. But if the number of models exceeds 10,000, the refresh will take place daily at the time you have specified.
- Enable Heartbeat Table: When the connection type is Source&Target or Source, you can enable this switch. TapData will create a _tapdata_heartbeat_table heartbeat table in the source database and update it every 10 seconds (requires appropriate permissions) to monitor the health of the data source connection and tasks. The heartbeat task starts automatically after the data replication/development task starts, and you can view the heartbeat task in the data source editing page.
- SSL Settings: Choose whether to enable SSL connection to the data source for enhanced data security. After enabling this feature, you will need to upload a CA file, client certificate, and key, and fill in the client password. For more information, see Generating Self-Signed Certificates.
- Connection Settings
Click Test. After the test passes, click Save.
tipIf the connection test fails, please follow the prompts on the page to troubleshoot.
FAQs
Q: What ports need to be open to ensure data synchronization? A: Full synchronization requires communication between the TiDB cluster and TapData on port 4000. For incremental data synchronization, the following ports also need to be open:
- Port 2379: Used for communication between PD and TiKV/TiDB and to provide external API interfaces. TiKV and TiDB use this port to obtain configuration information and scheduling commands from PD.
- Port 20160: Used by TiKV to provide external storage services, including handling SQL requests from TiDB, reading and writing data, and internal communication with other TiKV nodes (e.g., Raft protocol messages).
Q: Does TapData have any requirements for the deployment architecture of TiDB?
A: Both single-node and cluster deployment architectures of TiDB are supported.
Q: What should I do if my TiDB version is not within the 6.0.0 to 8.1.9 range and I need to perform incremental data synchronization?
A: The TapData TiDB connector integrates with TiCDC to parse change logs into ordered row-level changes. If your database is outside the supported versions, you can download the corresponding version of the Tiflow component from Github: tiflow and follow the steps below to compile the CDC tool yourself:
dangerExpanding to other versions of the Tiflow component may introduce uncertainties or affect running tasks. Please proceed with caution.
Extract the downloaded file, then navigate to the extracted directory and run the
makecommand to compile.Locate the generated cdc binary file and place it in the {tapData-dir}/run-resource/ti-db/tool directory on the TapData engine machine (replace if necessary).
Use the
chmodcommand to grant read, write, and execute permissions to the files in this directory.