MySQL
MySQL is the most widely used open-source relational database, serving as the data storage solution for many websites, applications, and commercial products. This document will guide you through adding an MySQL data source in TapData, which can be used as a source or target database to build real-time data pipelines.
Supported Versions and Architectures
- Version: MySQL 5.0 ~ 9
- Architecture: Single-node or primary-replica architecture
Supported Data Types
| Category | Data Types |
|---|---|
| String | CHAR, VARCHAR, TINYTEXT, TEXT, MEDIUMTEXT, LONGTEXT, BINARY, VARBINARY |
| Integer | TINYINT, SMALLINT, MEDIUMINT, INT, BIGINT |
| Numeric | DECIMAL, FLOAT, DOUBLE |
| Date/Time | DATE, TIME, DATETIME, TIMESTAMP, YEAR |
| Binary Large Objects | TINYBLOB, BLOB, MEDIUMBLOB, LONGBLOB |
| Spatial Data | POINT, LINESTRING, POLYGON, GEOMETRY, MULTIPOINT, MULTILINESTRING, MULTIPOLYGON, GEOMCOLLECTION |
| Other | BIT, ENUM, SET, JSON |
SQL Operations for Sync
DML: INSERT, UPDATE, DELETE
tipWhen MySQL is used as a target database, you can configure write policies through advanced settings in the task node: for insert conflicts, you can choose to update or discard; for update failures, you can choose to insert or just log the errors.
DDL: ADD COLUMN, CHANGE COLUMN, DROP COLUMN, RENAME COLUMN
In addition, for data synchronization between MySQL databases, extra support is provided for synchronizing column default values, auto-increment columns, and foreign key constraints.
Supported Sync Directions
- One-way sync
- Bidirectional sync
Considerations
- The TapData Agent and MySQL instance should be deployed in the same intranet environment. If connecting over the internet, make sure the network is accessible.
- Incremental data capture is mainly achieved through parsing the binlog, which may consume CPU and disk I/O resources if there are frequent data changes.
- In MySQL 5.6 and earlier versions, preprocess negative values for the TIME type (e.g., convert to a legal positive value) to avoid issues with incremental data capture.
- For some data sources based on the MySQL kernel, using schemas or functions not supported by native MySQL might cause errors in incremental data capture. In such cases, please contact TapData Support for assistance.
Limitations
- Source Side
- Target Side
- Consistency & Conflicts
Applicable when MySQL is used as a source:
- Only tables and indexes can be synchronized. Temporary tables, hidden columns, triggers, views, and stored procedures are not supported.
- Tapdata supports master-slave switchovers without interrupting sync, but the replication status must be consistent and the failover strategy properly configured. Otherwise, temporary interruptions or data loss may occur.
- To enable incremental data sync, make sure MySQL Binlog settings are correctly configured:
- The Binlog must be retained for at least 7 days, or Tapdata may fail to access it, resulting in incremental sync failures.
binlog_formatshould be set toROW,binlog_row_imagetoFULL, and the target database must not be included inbinlog-ignore-db.- If
binlog-do-dbis configured, the target database must be explicitly included; otherwise, incremental data may be missed.tipFor detailed information on Binlog configuration and parameters, refer to the official MySQL documentation.
- If incremental sync starts from a specific time and the corresponding Binlog has expired or been deleted, the task will fail to start.
Applicable when MySQL is used as a target:
- If the target tables already exist and need to be preserved, ensure the column order and data types are consistent with the source. Otherwise, write failures may occur due to schema mismatch.
- Indexes are synced only during initial DDL execution. Subsequent changes in source indexes will not be applied automatically.
- Initial sync supports normal indexes, unique indexes, primary keys, and composite indexes. Full-text index support is limited.
- When migrating between heterogeneous systems, MySQL’s spatial types, custom types, and ENUM/SET types will be converted to strings. You should verify that the target schema meets business expectations.
- When syncing between MySQL databases:
- Syncing from a lower to higher version is generally compatible.
- Syncing from a higher to lower version may fail due to unsupported features (e.g., relaxed time formats or invalid date values).
- Active-active conflict resolution is not supported in bidirectional MySQL sync. Avoid updating the same data on both sides at the same time.
- External writes (not handled by Tapdata) during sync may cause data inconsistencies.
- During full sync, avoid performing DDL operations on tables involved in the task, as this may lead to sync failure.
Preparation
As a Source Database
- Log in to the MySQL database and execute the following commands to create an account.
- MySQL 5.x
- MySQL 8.x and above
CREATE USER 'username'@'host' IDENTIFIED BY 'password';
CREATE USER 'username'@'host' IDENTIFIED WITH mysql_native_password BY 'password';
- username: Enter user name.
- password: Enter password.
- host: Enter the host that can be accessed by the account, percent (%) means to allow all host.
Example: Create an account named tapdata:
CREATE USER 'tapdata'@'%' IDENTIFIED BY 'yourpasswd';
- Grant permissions to the account that we just created, we recommend setting more granular permissions control based on business needs.
- Full Data Synchronization
- Full + Incremental Data Synchronization
-- Grant read permissions for the specified database
GRANT SELECT ON database_name.* TO 'username' IDENTIFIED BY 'password';
-- Grant read permissions for the specified database
GRANT SELECT ON database_name.* TO 'username' IDENTIFIED BY 'password';
-- Grant replication permissions
GRANT REPLICATION SLAVE, REPLICATION CLIENT ON *.* TO 'username' IDENTIFIED BY 'password';
- database_name: The name of the database to grant permissions.
- username: Enter user name.
- password: Enter password.
To ensure that the incremental data of the MySQL database can be read, you need to follow the steps below to turn on Binlog.
Use the
vimcommand to modify the configuration in$MYSQL_HOME/mysql.cnf, for example:server_id = 223344
log_bin = mysql-bin
expire_logs_days = 1
binlog_format = row
binlog_row_image = full- server_id: Set to an integer greater than 0, this value must be unique per server and replication client.
- log_bin: The base name of the Binlog sequence file.
- expire_logs_days: The number of days to retain binary log files, automatically deleting them upon expiration.
- binlog_format: Set to
row. - binlog_row_image: Set to
full.
After modification, restart the MySQL service with the following command:
/etc/init.d/mysqld restart(Optional) Log in to the MySQL database and execute the following command to confirm that the configuration has taken effect, that is, in the output result, the value of the binlog_format is ROW.
SHOW VARIABLES LIKE 'binlog_format';The output is as follows:
+---------------+-------+
| Variable_name | Value |
+---------------+-------+
| binlog_format | ROW   |
+---------------+-------+
1 row in set (0.00 sec)
As a Target Database
- Log in to the MySQL database and execute the following commands to create an account.
- MySQL 5.x
- MySQL 8.x and above
CREATE USER 'username'@'host' IDENTIFIED BY 'password';
CREATE USER 'username'@'host' IDENTIFIED WITH mysql_native_password BY 'password';
- username: Enter user name.
- password: Enter password.
- host: Enter the host that can be accessed by the account, percent (%) means to allow all host.
Example: Create an account named tapdata:
CREATE USER 'tapdata'@'%' IDENTIFIED BY 'yourpasswd';
- Grant permissions to the account that we just created, we recommend setting more granular permissions control based on business needs.
- Grant to Specified Database
- Grant to All Databases
GRANT SELECT, INSERT, UPDATE, DELETE, ALTER, CREATE, CREATE ROUTINE, CREATE TEMPORARY TABLES, DROP ON database_name.* TO 'username';
GRANT SELECT, INSERT, UPDATE, DELETE, ALTER, CREATE, CREATE ROUTINE, CREATE TEMPORARY TABLES, DROP ON *.* TO 'username';
- database_name: The name of the database to grant permissions.
- username: Enter user name.
Enable SSL Connection (Optional)
To further enhance the security of the data connection, you can choose to enable SSL (Secure Sockets Layer) encryption for MySQL databases. This provides encryption at the transport layer for network connections, enhancing the security of communication data while ensuring data integrity. The specific steps are as follows:
Log in to the device where MySQL is hosted and run the mysql_ssl_rsa_setup program to create SSL/RSA files. You can use the
findcommand to locate the program.Before performing this step, you can log in to the MySQL database and run the
SHOW GLOBAL VARIABLES LIKE '%ssl%';command to check if SSL/RSA files have been generated and if SSL is enabled./usr/bin/mysql_ssl_rsa_setuptip- Ensure that the device has openssl installed to run this program. For example, on CentOS, you can run
yum install openssl -yto install it. - After executing the command, the files
ca-key.pem,server-key.pem, andclient-key.pemwill be automatically generated, typically located in the/var/lib/mysql/directory. You can download these files for use when configuring the connection in TapData.
- Ensure that the device has openssl installed to run this program. For example, on CentOS, you can run
Use the
vimcommand to modify the configuration in$MYSQL_HOME/mysql.cnf, enabling forced SSL authentication and specifying the locations of the relevant SSL/RSA files. After modification, save and exit the editor.[mysqld]
require_secure_transport=ON
# Self-signed CA certificate
ssl-ca=/var/lib/mysql/ca.pem
# Server certificate file
ssl-cert=/var/lib/mysql/server-cert.pem
# Server private key file
ssl-key=/var/lib/mysql/server-key.pem
[client]
# Enable SSL enforced authentication
ssl-mode=REQUIRED
# Certificate file required by the client to connect to the server
ssl-cert=/var/lib/mysql/client-cert.pem
# Private key file required by the client to connect to the server
ssl-key=/var/lib/mysql/client-key.pemLog in to the MySQL database and optionally run the following commands to adjust the account for data synchronization/development tasks.
ALTER USER 'username'@'host' REQUIRE x509; -- Enforce client to provide valid certificate
ALTER USER 'username'@'host' REQUIRE ssl; -- Do not enforce client to provide valid certificate
FLUSH PRIVILEGES;- username: The username.
- host: The host allowed to log in with this account, with the percentage symbol (
%) representing any host.
Restart the MySQL database.
Connect to MySQL
In the left navigation panel, click Connections.
On the right side of the page, click Create.
In the pop-up dialog, search for and select MySQL.
On the redirected page, fill in the MySQL connection information as described below.
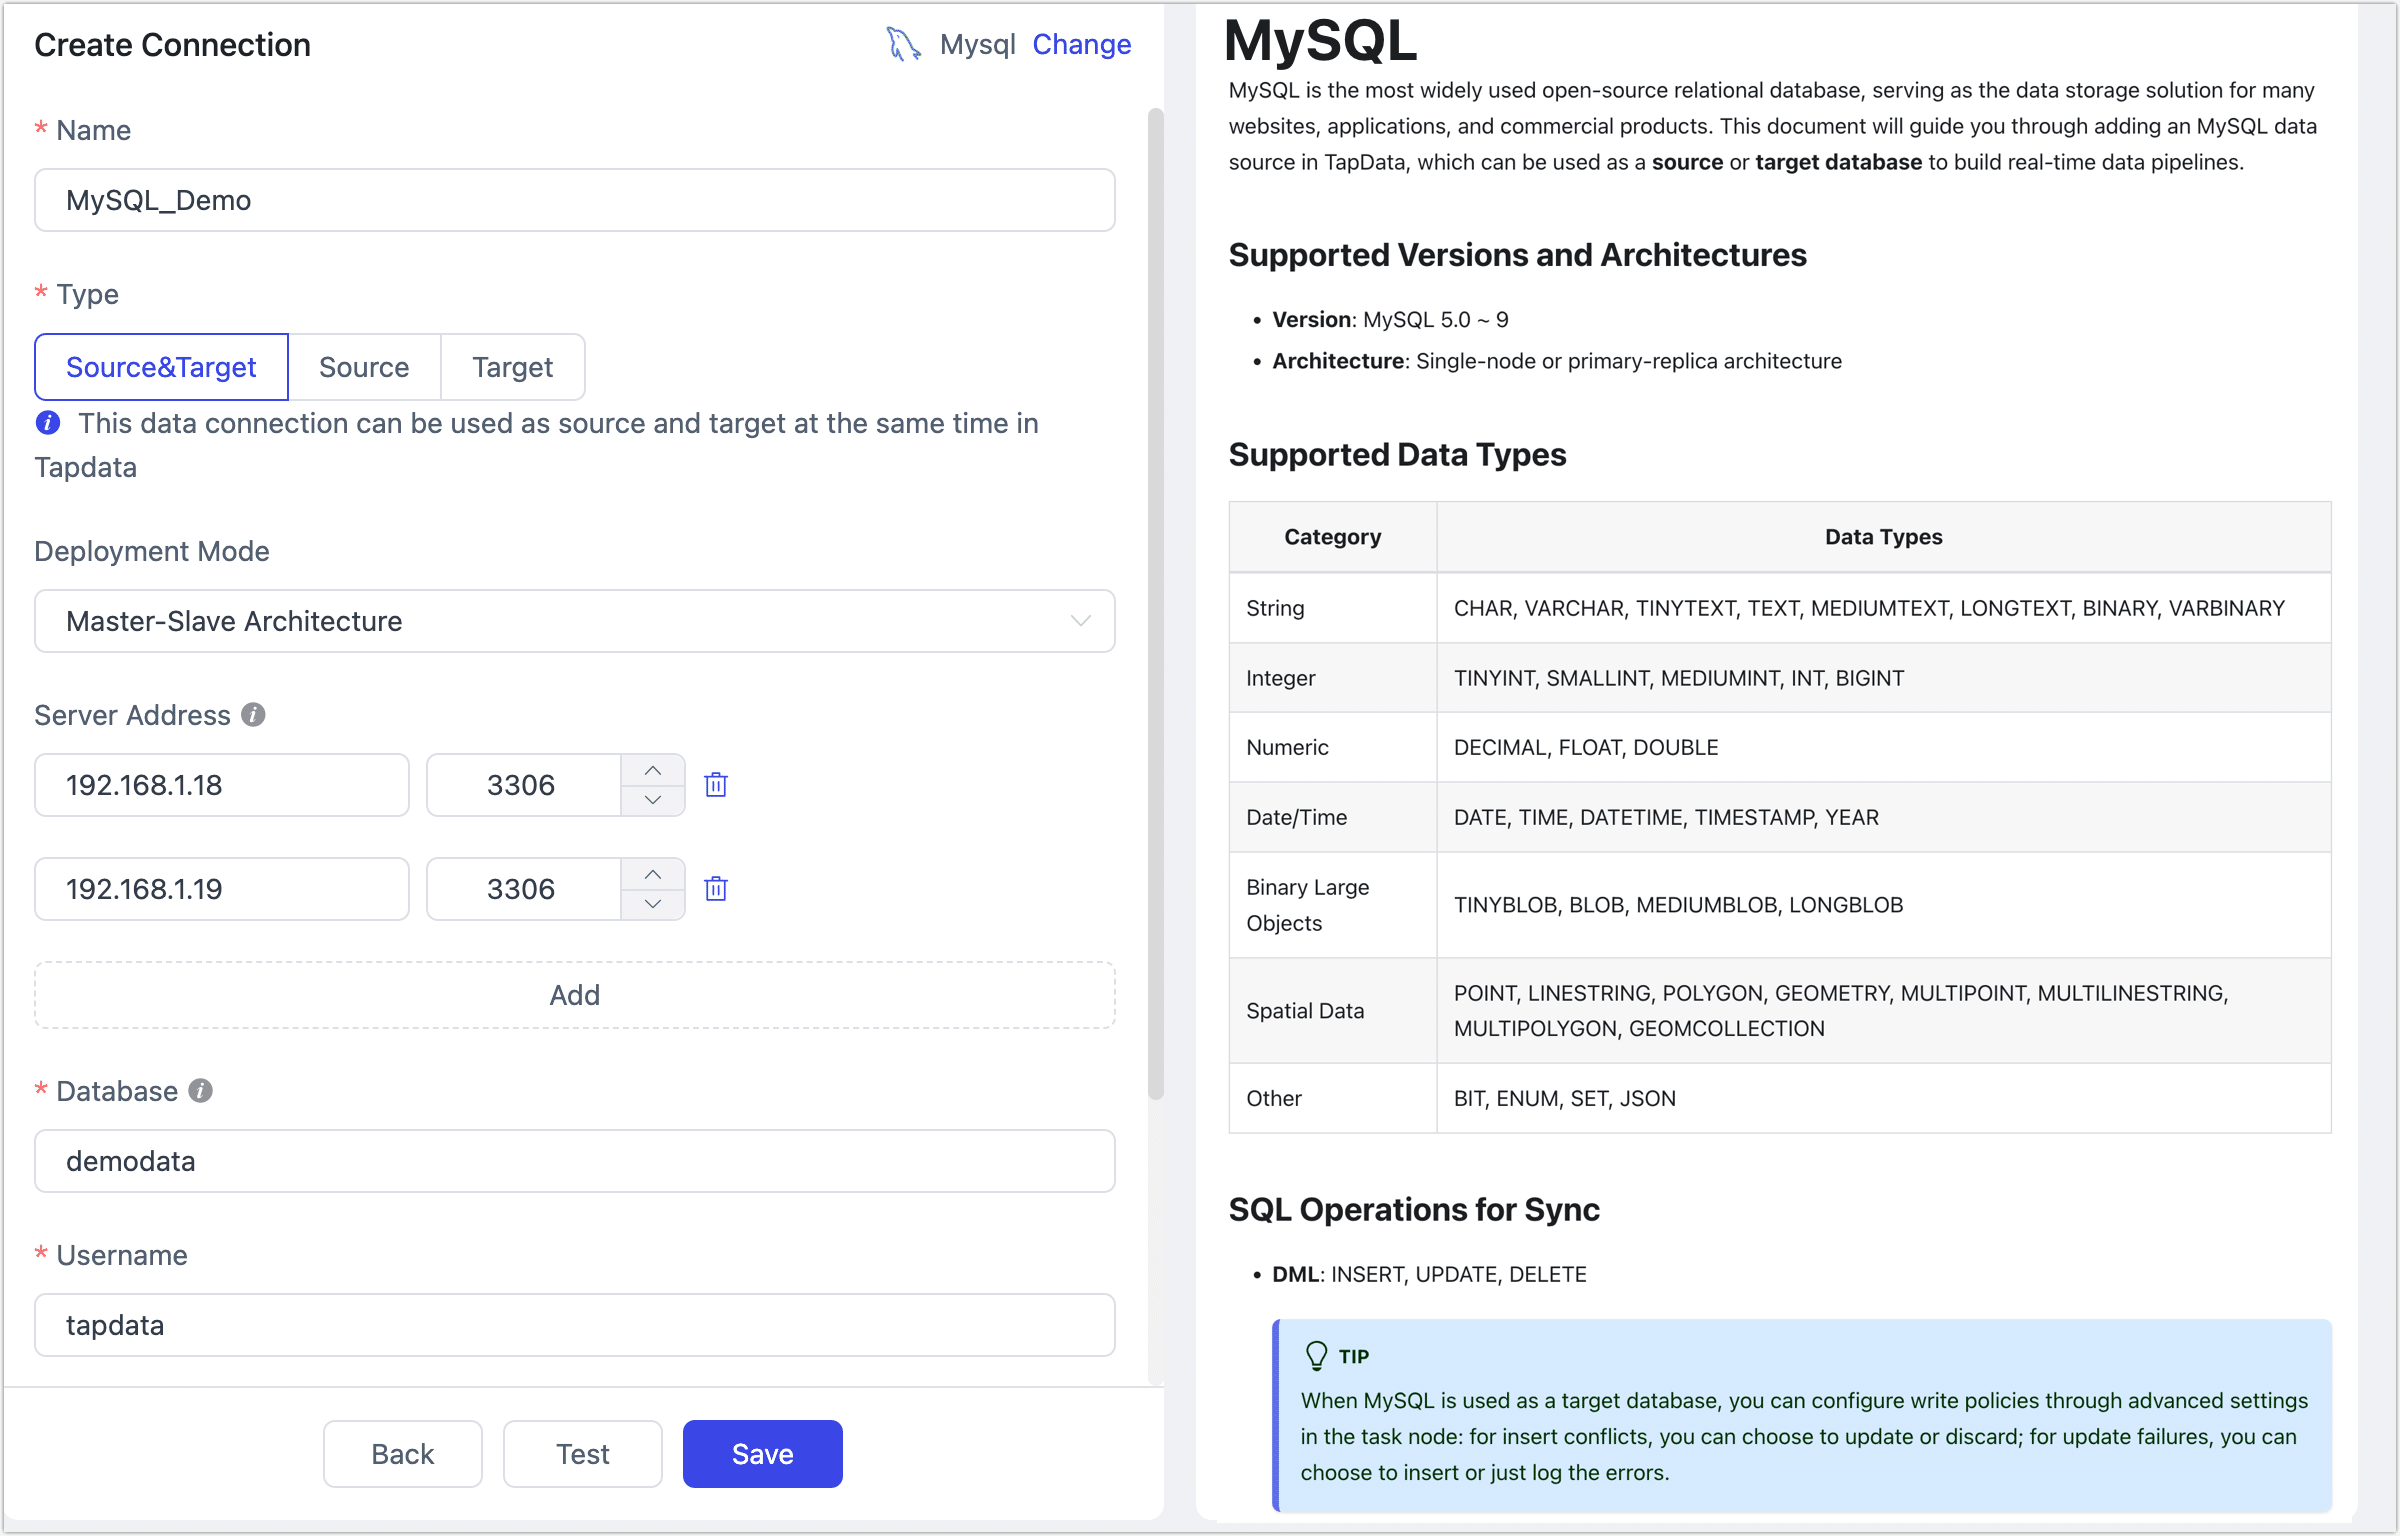
- Connection Settings
- Name: Enter a unique name with business significance.
- Type: Support using MySQL as either a source or target database.
- Deployment Mode: Support for single-node and primary-replica architecture. When selecting the primary-replica architecture, provide the primary and replica server addresses and service ports. The primary server information should be entered in the first row.
- Server Address: Database connection address.
- Port: Database service port.
- Database: The database name. Each connection corresponds to one database. If there are multiple databases, create multiple connections.
- Username: The database username.
- Password: The database password.
- Advanced Settings
- Connection Parameter String: Default is
useUnicode=yes&characterEncoding=UTF-8, indicating that data transmission will use the UTF-8 encoded Unicode character set, which helps avoid character encoding issues. - Timezone: Default is set to 0 timezone. If configured to another timezone, it will affect fields without timezone information (e.g.,
datetime). Fields with timezone information (e.g.,timestamp,date, andtime) are not affected. - CDC Log Caching: Mining the source database's incremental logs. This allows multiple tasks to share the same source database’s incremental log mining process, reducing duplicate reads and minimizing the impact of incremental synchronization on the source database. After enabling this feature, you will need to select an external storage to store the incremental log information.
- Contain Table: The default option is All, which includes all tables. Alternatively, you can select Custom and manually specify the desired tables by separating their names with commas (,).
- Exclude Tables: Once the switch is enabled, you have the option to specify tables to be excluded. You can do this by listing the table names separated by commas (,) in case there are multiple tables to be excluded.
- Agent Settings: Defaults to Platform automatic allocation, you can also manually specify an agent.
- Model Load Time: If there are less than 10,000 models in the data source, their schema will be updated every hour. But if the number of models exceeds 10,000, the refresh will take place daily at the time you have specified.
- Enable Heartbeat Table: When the connection type is source or target, you can enable this switch. TapData will create a
_tapdata_heartbeat_tableheartbeat table in the source database and update it every 10 seconds (requires appropriate permissions) to monitor the health of the data source connection and tasks. The heartbeat task starts automatically after the data replication/development task starts, and you can view the heartbeat task in the data source editing page.
- Connection Parameter String: Default is
- SSL Settings: Choose whether to enable SSL for the data source connection to enhance data security. After enabling this feature, you need to upload CA files, client certificates, client key files, etc., which were obtained in the Enable SSL Connection section.
- Connection Settings
Click Test, and after passing the test, click Save.
tipIf the connection test fails, please follow the prompts to resolve the issue.
Node Advanced Features
When configuring data synchronization/transformation tasks with MySQL as a source node, TapData provides more advanced features to better meet complex business requirements and maximize performance:
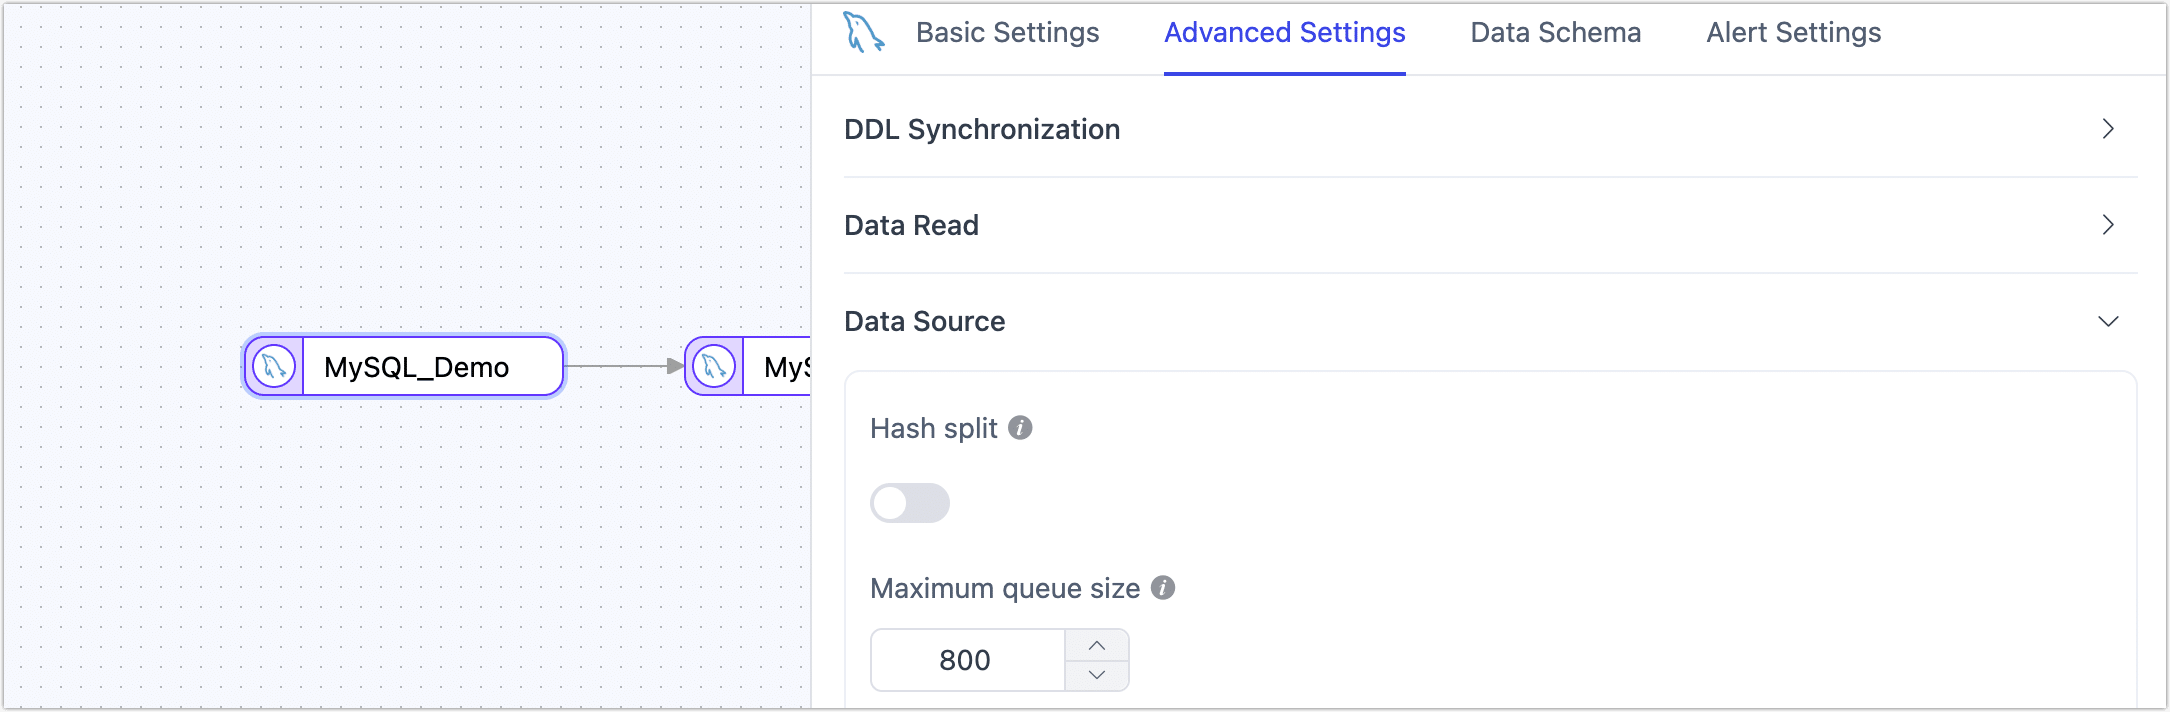
- Hash Split: When enabled, all table data will be split into multiple partitions based on hash values during the full sync phase, allowing concurrent data reading and significantly improving performance. However, it also increases the database load. The maximum number of partitions can be manually set after enabling this feature.
- Maximum Queue Size: Controls the capacity of the incremental data read queue, default is 800 (DML events). If the target database synchronization speed is slow or the individual rows are large, consider reducing this value.
FAQ
Q: Can I synchronze data from MySQL replicas?
A: Yes, in addition to implementing the above settings for MySQL replicas, you also need to:
Execute the following command to check the parameter configuration of the MySQL replicas and ensure that the value of log_slave_updates is 1.
Select @@log_slave_updatesExecute the command
SHOW SLAVE STATUSorSHOW REPLICA STATUSto check the delay information of the replica.Perform data synchronization after repairing according to specific error reporting.
Q: "Unknown error 1044" appears in the dialog after the connection test.
A: If the correct permissions have been granted, can be checked and fixed by:
SELECT host, user, Grant_priv, Super_priv FROM mysql.user WHERE user='username';
-- Check if the Grant_priv field value is 'Y'
-- If not, execute the following command:
UPDATE mysql.user SET Grant_priv='Y' WHERE user='username';
FLUSH PRIVILEGES;