PostgreSQL
PostgreSQL is a powerful open-source object-relational database management system (ORDBMS). TapData supports using PostgreSQL as both a source and target database, helping you quickly build real-time data pipelines. This document will introduce how to connect PostgreSQL as a data source in the TapData platform.
Supported Versions and Architectures
- Versions: PostgreSQL 9.4 to 16
- Architectures: Stand-alone or Replication architecturestip
Under a Replication architecture, if you need to read incremental data changes from the Standby server, you need select the Walminer plugin when configuring the data source.
Supported Data Types
| Category | Data Types |
|---|---|
| Strings & Text | character, character varying, text |
| Numeric | integer, bigint, smallint, numeric, real, double precision |
| Binary | bytea |
| Bit | bit, bit varying |
| Boolean | boolean |
| Date & Time | timestamp without time zone, timestamp with time zone, date, time without time zone, time with time zone, interval |
| Spatial Data | geometry, point, polygon, circle, path, box, line, lseg |
| Network Types | inet, cidr, macaddr |
| Identifier | uuid, oid, regproc, regprocedure, regoper, regoperator, regclass, regtype, regconfig, regdictionary |
| Text Search | tsvector, tsquery |
| Others | xml, json, jsonb, array |
When using PostgreSQL as the target database or obtaining incremental data via the Wal2json plugin, the following data types are not supported: tsvector, tsquery, regproc, regprocedure, regoper, regoperator, regclass, regtype, regconfig, and regdictionary. If the Walminer plugin is used, these types are also not supported, along with array and oid types.
Supported Operations
INSERT, UPDATE, DELETE
- When used as a target, you can configure advanced write strategies in the task node settings. Options include update or discard on insert conflict, insert or log on update failure, and enable file-based writes. Additionally, you can apply and execute source-side ADD COLUMN, CHANGE COLUMN, DROP COLUMN, and RENAME COLUMN operations.
- For data synchronization between PostgreSQL databases, extra support is provided for synchronizing column default values, auto-increment columns, and foreign key constraints.
Limitations
- When PostgreSQL is used as a source database, capturing its DDL (like adding fields) is not supported, nor is specifying a time for incremental data capture.
- PostgreSQL does not support storing
\0in string types; TapData will automatically filter it to avoid exceptions. - To capture incremental events for partitioned parent tables, PostgreSQL version 13 or above must be used, and the pgoutput plugin must be selected.
- The Walminer plugin currently only supports connecting and merging shared mining.
Considerations
- When using log-based plugins that rely on replication slots (e.g., wal2json), too many shared mining processes may cause WAL log accumulation, increasing disk pressure. It's recommended to reduce the number of mining processes or promptly delete unnecessary CDC tasks and replication slots.
- PostgreSQL logical replication relies on the creation of a replication slot. If there are ongoing tasks in the database (such as refreshing materialized views), they may block the creation of replication slots. If the connection test becomes unresponsive for an extended period, it is recommended to check for such tasks.
- Plugins based on WAL logs (e.g., walminer) will frequently read and write to the
walminer_contentstable during shared mining, generating some load. However, since only single-task mining is currently supported, the impact is relatively small.
Preparation
As a Source Database
Log in to the PostgreSQL database as an administrator.
Create a user and grant permissions.
Execute the following command format to create an account for data synchronization/development tasks.
CREATE USER username WITH PASSWORD 'password';- username: Username.
- password: Password.
Execute the following command format to grant account permissions.
- Read Full Data Only
- Read Full and Incremental Data
-- Switch to the database to be authorized
\c database_name

-- Grant table read permission for the target schema
GRANT SELECT ON ALL TABLES IN SCHEMA schema_name TO username;

-- Grant USAGE permission to schema
GRANT USAGE ON SCHEMA schema_name TO username;
-- Switch to the database to be authorized
\c database_name
-- Grant table read permission for the target schema
GRANT SELECT ON ALL TABLES IN SCHEMA schema_name TO username;
-- Grant USAGE permission to schema
GRANT USAGE ON SCHEMA schema_name TO username;
-- Grant replication permission
ALTER USER username REPLICATION;- database_name: Database name.
- schema_name: Schema name.
- username: Username.
- Execute the following command format to modify the replica identity to FULL (using the entire row as the identifier), which determines the fields recorded in the log when data undergoes UPDATE/DELETE.tip
If you only need to read full data from PostgreSQL, you can skip this and the subsequent steps.
ALTER TABLE 'schema_name'.'table_name' REPLICA IDENTITY FULL;- schema_name: Schema name.
- table_name: Table name.
Log in to the server hosting PostgreSQL, and choose the decoder plugin to install based on business needs and version:
Wal2json (Recommended): Suitable for PostgreSQL 9.4 and above, converts WAL logs to JSON format, simple to use, but requires source tables to have primary keys; otherwise, delete operations cannot be synchronized.
Pgoutput: An internal logical replication protocol introduced in PostgreSQL 10, no additional installation needed. For tables with primary keys and
replica identityset todefault, thebeforein update events will be empty, which can be solved by settingreplica identity full. Additionally, if you do not have database-level CREATE permissions, you need to run the following commands to create the required PUBLICATION:CREATE PUBLICATION dbz_publication_root FOR ALL TABLES WITH (PUBLISH_VIA_PARTITION_ROOT = TRUE);
CREATE PUBLICATION dbz_publication FOR ALL TABLES;Decoderbufs: Suitable for PostgreSQL 9.6 and above, uses Google Protocol Buffers to parse WAL logs but requires more complex configuration.
Walminer: Does not rely on logical replication, doesn't require setting
wal_leveltological, or adjusting replication slot configuration, but requires superuser permissions.
Next, we will demonstrate the installation process using Wal2json as an example.
tipIn this example, PostgreSQL version 12 is installed on CentOS 7. If your environment differs, you will need to adjust the installation steps for development package versions, environment variable paths, etc.
Add the repository package.
yum install https://download.postgresql.org/pub/repos/yum/reporpms/EL-7-x86_64/pgdg-redhat-repo-latest.noarch.rpmInstall the PostgreSQL 12 development package.
yum install -y postgresql12-develSet environment variables and activate them.
export PATH=$PATH:/usr/pgsql-12/bin
source /etc/profile
Install environment dependencies, including llvm, clang, gcc, etc.
yum install -y devtoolset-7-llvm centos-release-scl devtoolset-7-gcc* llvm5.0Execute the following commands in sequence to complete the installation of the plugin.
# Clone and enter the directory
git clone https://github.com/eulerto/wal2json.git && cd wal2json

# Enter the scl's devtoolset environment
scl enable devtoolset-7 bash

# Compile and install
make && make install
Modify the
postgresql.confconfiguration file and set thewal_levelvalue tological.tipIf PostgreSQL version is 9.4, 9.5, or 9.6, also increase the values of
max_replication_slotsandmax_wal_senders(e.g., set to 10).Modify the
pg_hba.confconfiguration file, adding the following content to ensure TapData can access the database.# Replace username with the actual username
local replication username trust
host replication username 0.0.0.0/32 md5
host replication username ::1/128 trustRestart the PostgreSQL service during a low business peak period.
service postgresql-12.service restart
(Optional) Test the log plugin.
Connect to the postgres database, switch to the database to be synchronized, and create a test table.
-- Suppose the database to be synchronized is demodata, and the schema is public
\c demodata
CREATE TABLE public.test_decode
(
  uid    integer not null
      constraint users_pk
          primary key,
  name   varchar(50),
  age    integer,
  score  decimal
);
Create a Slot connection, using the wal2json plugin as an example.
SELECT * FROM pg_create_logical_replication_slot('slot_test', 'wal2json');Insert a record into the test table.
INSERT INTO public.test_decode (uid, name, age, score)
VALUES (1, 'Jack', 18, 89);
Listen to the log and check if there is information about the insert operation.
SELECT * FROM pg_logical_slot_peek_changes('slot_test', null, null);Example return (displayed vertically):
lsn  | 0/3E38E60
xid  | 610
data | {"change":[{"kind":"insert","schema":"public","table":"test_decode","columnnames":["uid","name","age","score"],"columntypes":["integer","character varying(50)","integer","numeric"],"columnvalues":[1,"Jack",18,89]}]}
If there are no issues, delete the Slot connection and the test table.
SELECT * FROM pg_drop_replication_slot('slot_test');
DROP TABLE public.test_decode;
(Optional) If you need to use the last update timestamp for incremental synchronization, perform the following steps.
Execute the following command in the source database to create a common function. Replace the schema name as needed.
CREATE OR REPLACE FUNCTION schema_name.update_lastmodified_column()
  RETURNS TRIGGER LANGUAGE plpgsql AS $$
  BEGIN
      NEW.last_update = now();
      RETURN NEW;
  END;
$$;
Create fields and triggers; this must be done for each table, for example, a table named mytable.
// Create the last_update field
ALTER TABLE schema_name.mytable ADD COLUMN last_update timestamp DEFAULT now();

// Create a trigger
CREATE TRIGGER trg_uptime BEFORE UPDATE ON schema_name.mytable FOR EACH ROW EXECUTE PROCEDURE
  update_lastmodified_column();
As a Target Database
Log in to the PostgreSQL database as an administrator.
Execute the following command format to create an account for data synchronization/development tasks.
CREATE USER username WITH PASSWORD 'password';- username: Username.
- password: Password.
Execute the following command format to grant database account permissions.
-- Switch to the database to be authorized
\c database_name;

-- Grant USAGE and CREATE permissions for the target schema
GRANT CREATE, USAGE ON SCHEMA schemaname TO username;

-- Grant read and write permissions for tables in the target schema
GRANT SELECT, INSERT, UPDATE, DELETE, TRUNCATE ON ALL TABLES IN SCHEMA schemaname TO username;

-- If the synchronization involves foreign key relationships or requires disabling triggers on the target table, grant the user permission to ignore foreign key constraints (superusers can skip this step).
-- To restore foreign key and trigger constraints, change the value from replica to origin.
ALTER USER username SET session_replication_role = 'replica';

-- Due to PostgreSQL's own limitations, for tables without primary keys, the following command must be executed to use update and delete (TapData will automatically execute it)
ALTER TABLE schema_name.table_name REPLICA IDENTITY FULL;- database_name: Database name.
- schema_name: Schema name.
- username: Username.
Enable SSL Connection (Optional)
To further enhance the security of the data pipeline, you can enable SSL (Secure Sockets Layer) encryption for PostgreSQL, providing encrypted network connections at the transport layer. This improves communication data security while ensuring data integrity.
Log in to the device hosting the PostgreSQL database and execute the following commands to create a self-signed certificate.
# Generate root certificate private key (pem file)
openssl genrsa -out ca.key 2048

# Generate root certificate signing request file (csr file)
openssl req -new -key ca.key -out ca.csr -subj "/C=CN/ST=myprovince/L=mycity/O=myorganization/OU=mygroup/CN=myCA"

# Create a self-signed root certificate, valid for one year:
openssl x509 -req -days 365 -extensions v3_ca -signkey ca.key -in ca.csr -out ca.crt
Execute the following commands in sequence to generate server private key and certificate.
# Generate server private key
openssl genrsa -out server.key 2048

# Generate server certificate request file
openssl req -new -key server.key -out server.csr -subj "/C=CN/ST=myprovince/L=mycity/O=myorganization/OU=mygroup/CN=myServer"

# Use self-signed CA certificate to issue server certificate, valid for one year
openssl x509 -req -days 365 -extensions v3_req -CA ca.crt -CAkey ca.key -CAcreateserial -in server.csr -out server.crt
(Optional) Execute
openssl verify -CAfile ca.crt server.crtto verify whether the server certificate is correctly signed.Execute the following commands in sequence to generate client private key and certificate.
# Generate client private key
openssl genrsa -out client.key 2048

# Generate certificate request file, for user1 (full authentication should focus on users)
openssl req -new -key client.key -out client.csr -subj "/C=CN/ST=myprovince/L=mycity/O=myorganization/OU=mygroup/CN=user1"

# Use root certificate to issue client certificate
openssl x509 -req -days 365 -extensions v3_req -CA ca.crt -CAkey ca.key -CAcreateserial -in client.csr -out client.crt
(Optional) Execute
openssl verify -CAfile ca.crt client.crtto verify whether the client certificate is correctly signed.Modify the following PostgreSQL configuration files to enable SSL and specify the relevant certificate/key files.
- postgresql.conf
- pg_hba.conf
ssl = on
ssl_ca_file = 'ca.crt'
ssl_cert_file = 'server.crt'
ssl_crl_file = ''
ssl_key_file = 'server.key'
ssl_ciphers = 'HIGH:MEDIUM:+3DES:!aNULL' # allowed SSL ciphers
ssl_prefer_server_ciphers = on
hostssl all all all trust clientcert=verify-ca
Connect to PostgreSQL
In the left navigation bar, click Connections.
Click Create on the right side of the page.
In the pop-up dialog box, search for and select PostgreSQL.
On the redirected page, fill in the connection information for PostgreSQL as described below.
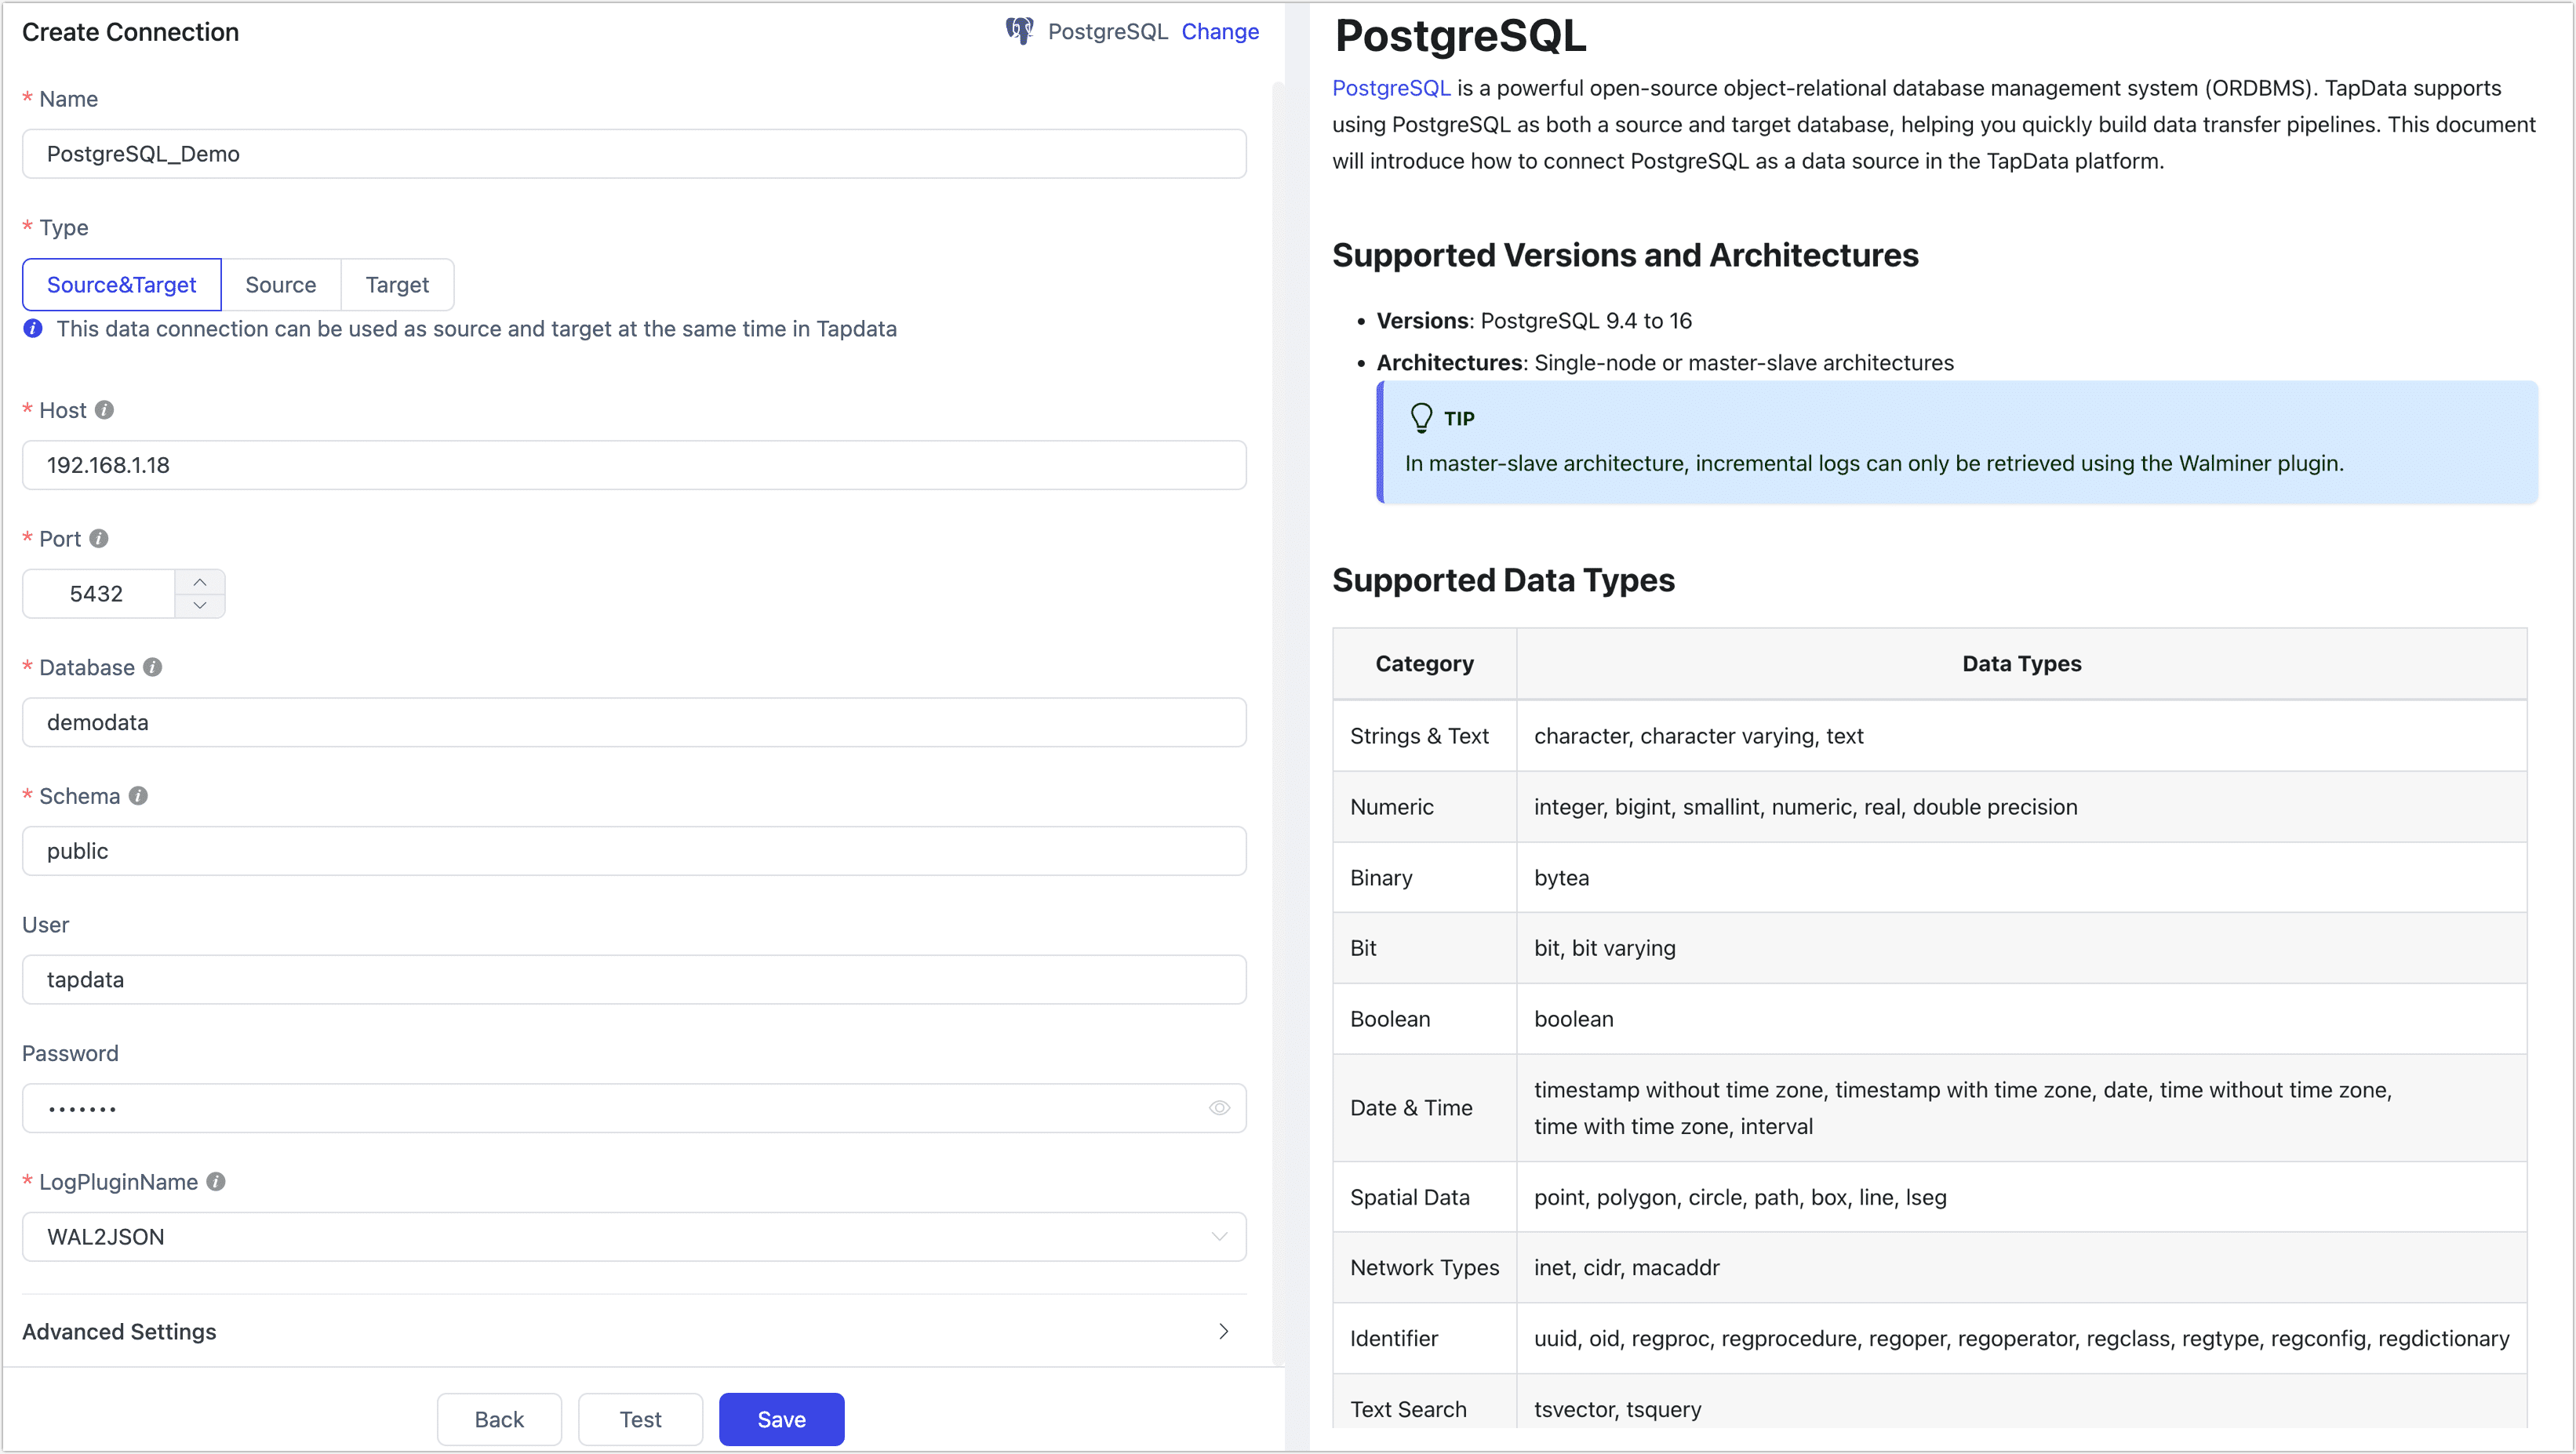
- Connection Settings
- Name: Enter a unique name that has business significance.
- Type: Supports using PostgreSQL as a source or target database.
- Host: Database connection IP address or hostname.
- Port: Database service port.
- Database: The name of the database, i.e., one connection corresponds to one database. If there are multiple databases, multiple data connections need to be created.
- Schema: Schema name.
- User: Database username.
- Password: Password corresponding to the database username.
- Log Plugin Name: To read data changes from PostgreSQL and achieve incremental data synchronization, you need to follow the guidance in the Preparation section to select and install the appropriate plugin.
- Advanced Settings
- ExtParams: Additional connection parameters, default is empty.
- Timezone: Defaults to timezone 0. You can also specify it manually according to business needs. Configuring a different timezone will affect timezone-related fields, such as DATE, TIMESTAMP, TIMESTAMP WITH TIME ZONE, etc.
- CDC Log Caching: Mining the source database's incremental logs. This allows multiple tasks to share the same source database’s incremental log mining process, reducing duplicate reads and minimizing the impact of incremental synchronization on the source database. After enabling this feature, you will need to select an external storage to store the incremental log information.
- Contain Table: The default option is All, which includes all tables. Alternatively, you can select Custom and manually specify the desired tables by separating their names with commas (,).
- Exclude Tables: Once the switch is enabled, you have the option to specify tables to be excluded. You can do this by listing the table names separated by commas (,) in case there are multiple tables to be excluded.
- Agent Settings: Defaults to Platform automatic allocation, you can also manually specify an agent.
- Model Load Time: If there are less than 10,000 models in the data source, their schema will be updated every hour. But if the number of models exceeds 10,000, the refresh will take place daily at the time you have specified.
- Enable Heartbeat Table: When the connection type is set to Source and Target or Source, you can enable this option. Once the task references and starts using this data source, TapData will create a heartbeat table named _tapdata_heartbeat_table in the source database and update its data every 10 seconds (the database account must have relevant permissions), to monitor the health of the data source connection and task.
- SSL Settings: Choose whether to enable SSL to connect to the data source, which can further enhance data security. After enabling this function, you need to upload CA files, client certificates, and fill in the client password.
- Connection Settings
Click Test, and after passing the test, click Save.
tipIf the connection test fails, please follow the prompts on the page to make the necessary corrections.
Node Advanced Features
When configuring data synchronization/conversion tasks, you can use PostgreSQL as a source or target node. To better meet complex business needs and maximize performance, TapData provides more advanced features that you can configure based on business needs:
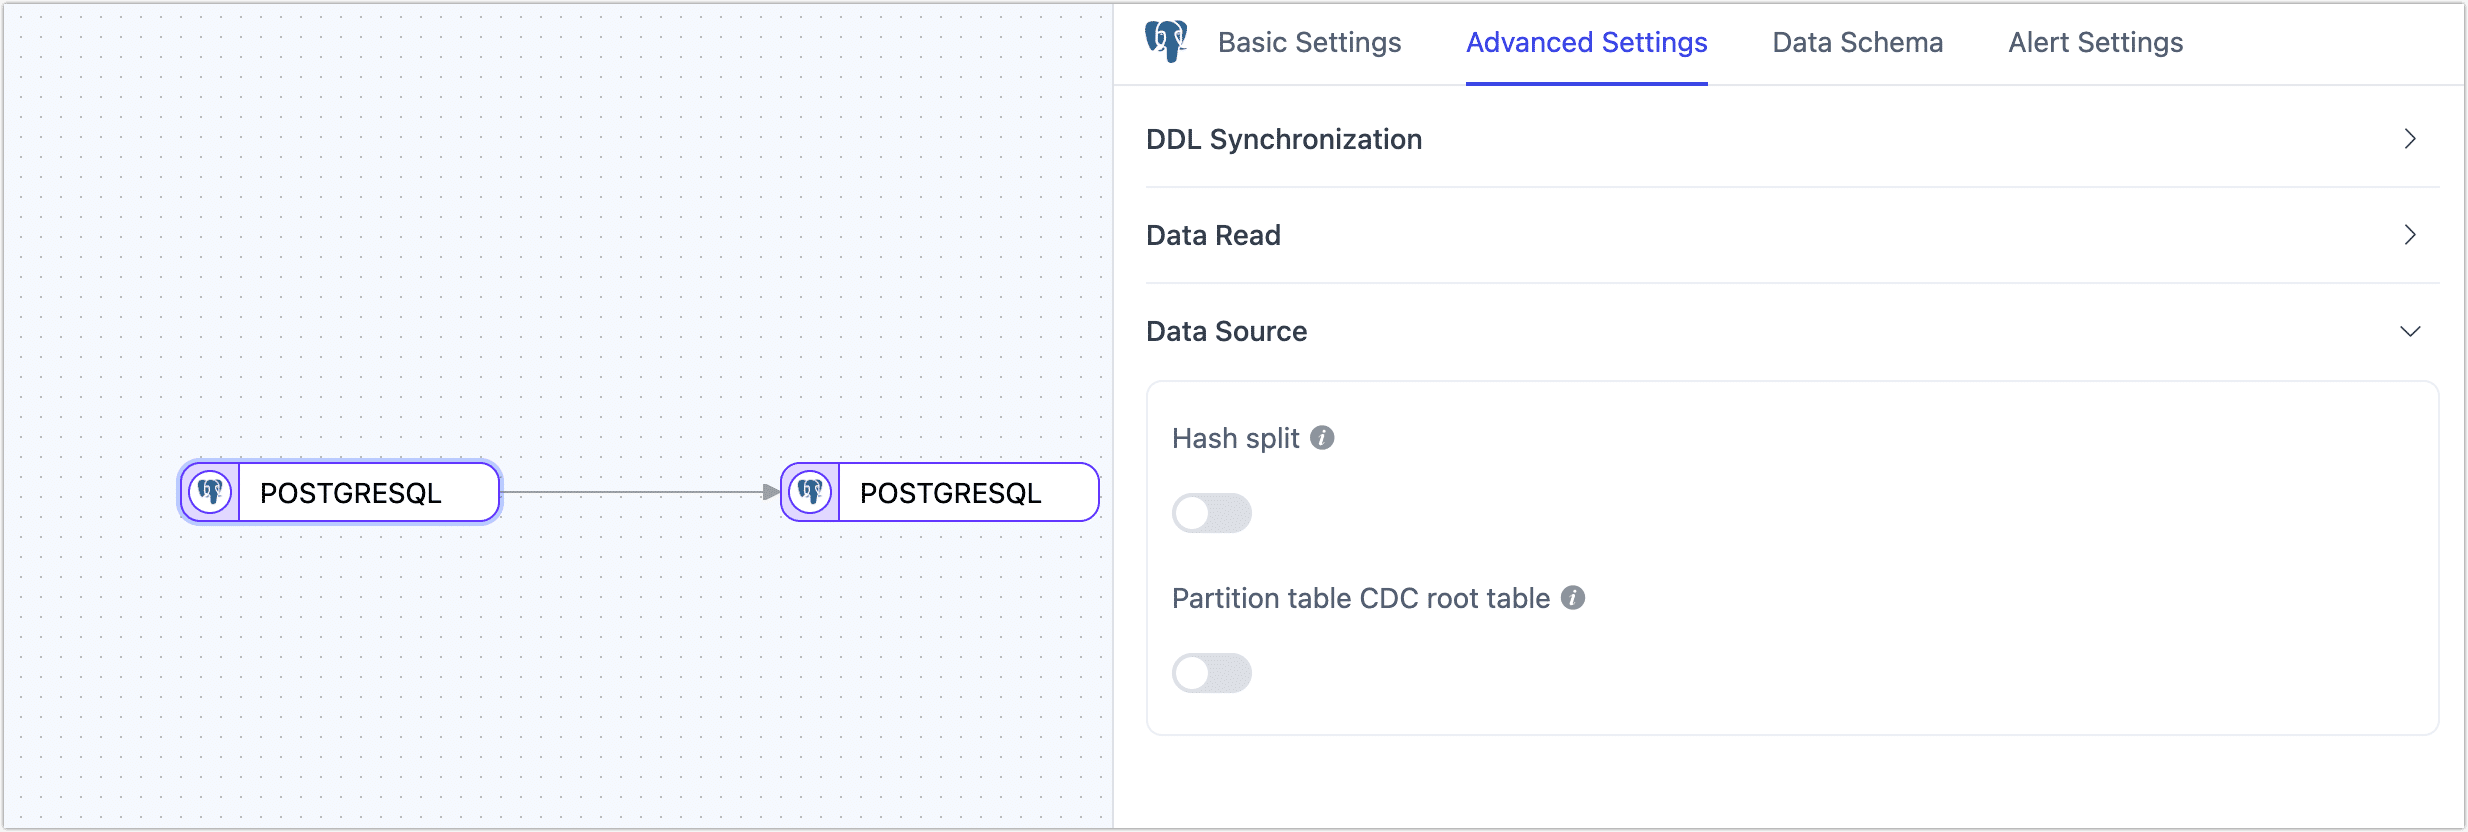
- As a Source Node
- Hash Sharding: When enabled, all table data will be split into multiple shards based on hash values during the full synchronization phase, allowing concurrent data reading. This significantly improves reading performance but also increases the database load. The maximum number of shards can be manually set after enabling this option.
- Partition Table CDC Root Table: Supported only in PostgreSQL 13 and above, and when selecting the pgoutput log plugin. When enabled, only CDC events for root tables will be detected; when disabled, only CDC events for child tables will be detected.
- Max Queue Size: Specifies the queue size for reading incremental data in PostgreSQL. The default value is 8000. If the downstream synchronization is slow or individual table records are too large, consider lowering this value.
- As a Target Node
- Ignore NotNull: Default is off, meaning NOT NULL constraints will be ignored when creating tables in the target database.
- Specify Table Owner: When synchronizing to PostgreSQL, you can specify the owner of automatically created tables. Ensure that the account used for data synchronization has the necessary permissions. If not, log in to the database as an administrator and execute
ALTER USER <tapdataUser> INHERIT;andGRANT <tableOwner> TO <tapdataUser>;. - Synchronize Auto-Increment Columns: When using PostgreSQL 10 or later, enabling this option allows the synchronization of auto-increment column properties from the source database to the target table, using
GENERATED BY DEFAULT AS IDENTITYto generate unique sequential values. - Auto-Increment Key Jump Value: When Synchronize Auto-Increment Columns is enabled, there may be gaps in auto-incremented IDs (e.g., 1, 2, 4, 5, missing 3), typically caused by database caching or restarts. The default value is
1000000, which pre-allocates numbers to enhance performance. While transactions rollback or restarts may result in skipped values, uniqueness remains unaffected. - Apply Default Values: Disabled by default. When enabled, field default values will be synchronized, applicable to standard strings and numbers. For heterogeneous data source synchronization, expression and function support is limited, currently supporting
CURRENT_TIMESTAMP,CURRENT_USERandgen_random_uuid(). - Enable File Input: Disabled by default. When enabled, TapData uses the COPY method to efficiently batch write data in file format, avoiding performance degradation caused by constraint conflicts. This significantly improves synchronization efficiency for large datasets. Note that binary data types (bytea) are not supported in this mode.
FAQs
Q: Why does resetting a task that uses PostgreSQL as the data source fail?
A: When resetting or deleting a task, TapData needs to clean up the logical replication SLOT in the database. If the PostgreSQL database cannot be connected at this time, the reset may fail.
Q: After running a TapData task, there are many SLOTs in PostgreSQL. Can these be cleaned up?
A: Each task using a log plugin based on replication slots will leave a SLOT in PostgreSQL if the task is temporarily stopped. Cleaning these SLOTs may cause the task to lose the offset upon restart, leading to incomplete data. If the task is no longer needed, you can reset or delete the task to clean up the SLOT in a timely manner. Additionally, if using other slot-based synchronization tools, there may be situations where the replication slot cannot be cleaned up, requiring manual handling.
Q: What if SLOT connections cannot be deleted from the PostgreSQL master node after CDC unexpectedly disconnects?
A: You can log in to the master node to delete the relevant SLOT to avoid it being continuously occupied. The cleaning method is as follows:
-- Check if there is any information with slot_name=tapdata
TABLE pg_replication_slots;

-- Delete the Slot node
select * from pg_drop_replication_slot('tapdata');