MongoDB
TapData supports MongoDB (4.0 and above) as a data source, enabling real-time CDC sync, incremental replication, and flexible pipeline building.
MongoDB is a popular open-source NoSQL database designed for flexible and scalable data storage. This document explains how to connect MongoDB in TapData, supporting real-time CDC synchronization and incremental replication. MongoDB can be used as a source or target to build data pipelines for real-time processing, denormalization, migration, and disaster recovery.
Supported Versions and Architectures
| Category | Description |
|---|---|
| Version | MongoDB 4.0 and above. For MongoDB 3.4 and below, please choose the data source named MongoDB Below 3.4. |
| Architecture | ● As a source: Supports replica set and sharded cluster architectures. Additionally, full and incremental data synchronization can be performed from the secondary nodes of a sharded cluster. ● As a target: Supports single node, replica set, and sharded cluster architectures. |
Supported Data Types
| Category | Data Types |
|---|---|
| Strings and Code | String, JavaScript, Symbol |
| Numeric Types | Double, Int32, Int64, Decimal128 |
| Document and Array | Document, Array |
| Binary and ObjectId | Binary, ObjectId |
| Boolean Type | Boolean |
| Date and Timestamp | Date, Timestamp |
| Special Types | Min Key, Max Key, Null |
SQL Operations for Sync
DML: INSERT, UPDATE, DELETE
When MongoDB is used as a target database, you can select the write strategy through the advanced settings of the task node: in case of insert conflicts, you can choose to convert to an update or discard the record; in case of update failures, you can choose to convert to an insert or just log the issue.
Prerequisites
As a Source Database
Make sure that the schema of the source database is a replica set or a sharding cluster. If it is standalone, you can configure it as a single-member replica set to open Oplog. For more information, see Convert a Standalone to a Replica Set.
To ensure sufficient storage space for the Oplog, it is important to configure it to accommodate at least 24 hours' worth of data. For detailed instructions, see Change the Size of the Oplog.
To create an account and grant permissions according to permission management requirements, follow the necessary steps.
- Grant Read Access to Specific Databases
- Grant Read Access to All Databases
use admin
db.createUser(
  {
    user: "tapdata",
    pwd: "my_password",
    roles: [
       { role: "read", db: "database_name" },
       { role: "read", db: "local" },
       { role: "read", db: "config" },
       { role: "clusterMonitor", db: "admin" },
    ]
  }
)
use admin
db.createUser(
{
user: "tapdata",
pwd: "my_password",
roles: [
{ role: "readAnyDatabase", db: "admin" },
{ role: "clusterMonitor", db: "admin" },
]
}
)tipIn shard cluster architectures, the shard server is unable to retrieve user permissions from the config database. Therefore, it is necessary to create corresponding users and grant permissions on the master nodes of each shard.
When the source database is a cluster, in order to improve data synchronization performance, TapData Cloud will create a thread for each shard and read the data. Before configuring data synchronization/development tasks, you also need to perform the following operations.
For sharded cluster architectures, to improve data synchronization performance, TapData will create a thread for each shard to read data. Before configuring data synchronization/development tasks, you also need to perform the following operations:
- Stop the Balancer to avoid data inconsistency caused by chunk migrations.
- Clean up orphaned documents to avoid _id conflicts.
As a Target Database
Grant write role to specified database (e.g. demodata) and clusterMonitor role for data validation, e.g.:
use admin
db.createUser(
  {
    user: "tapdata",
    pwd: "my_password",
    roles: [
       { role: "readWrite", db: "demodata" },
       { role: "clusterMonitor", db: "admin" },
    ]
  }
)
Connect to MongoDB
In the left navigation bar, click Connections.
Click Create on the right side of the page.
In the pop-up dialog, search and select MongoDB.
On the redirected page, fill in the MongoDB connection information as described below.
- Connection Settings
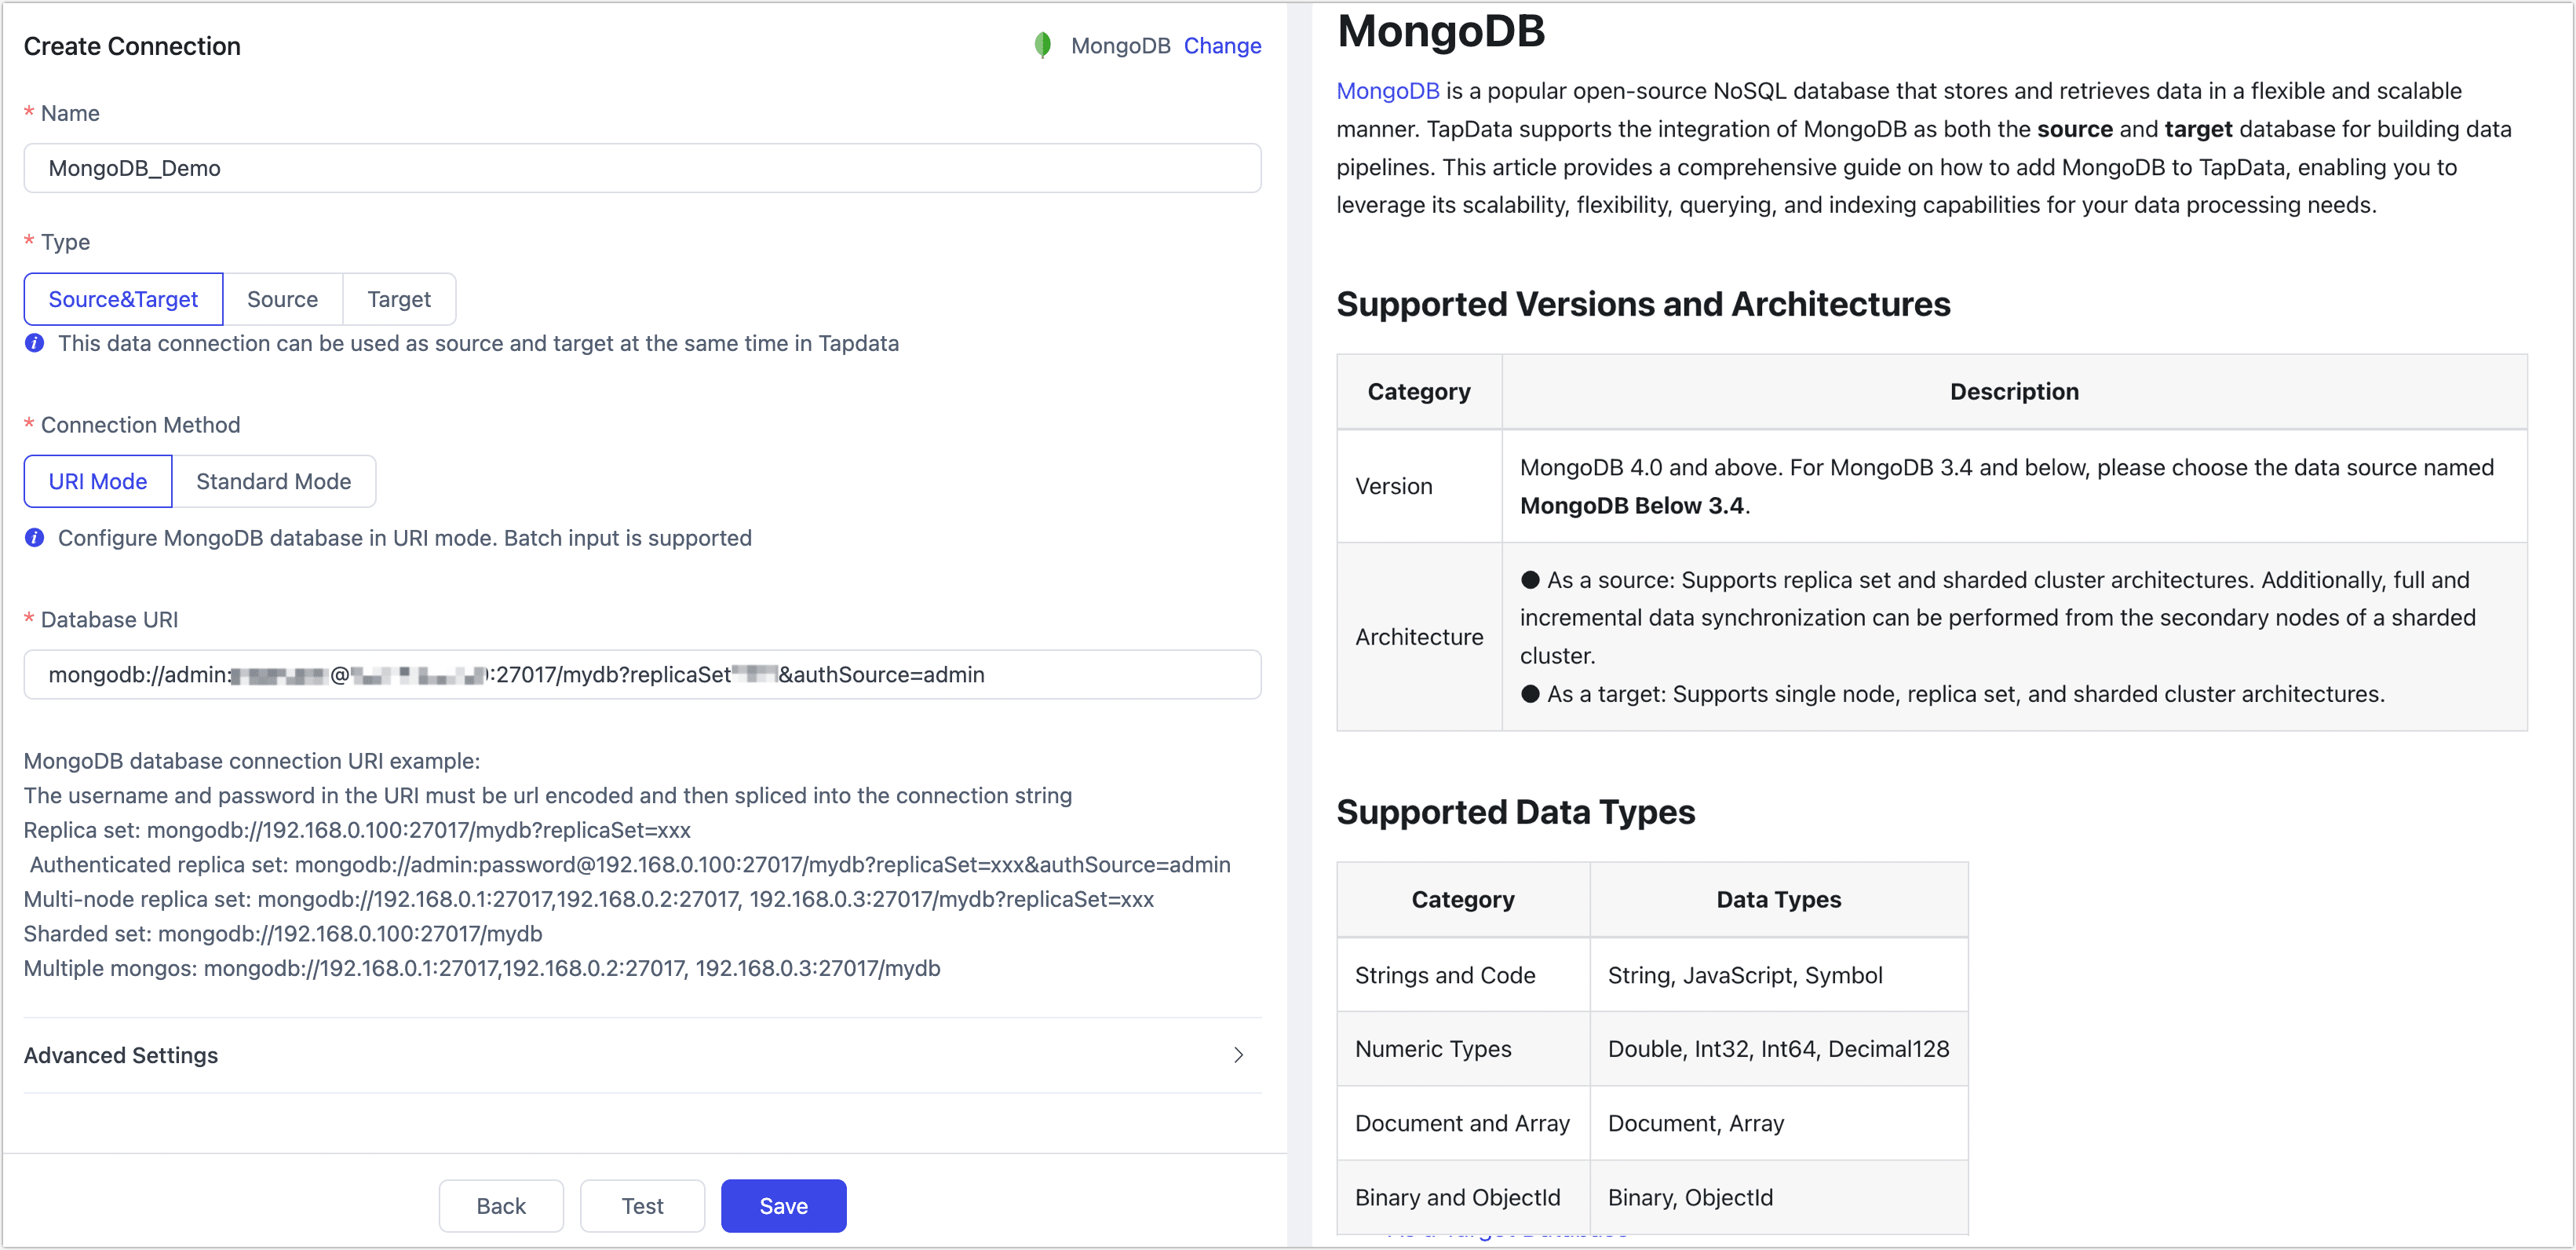
- Name: Fill in a unique name that has business significance.
- Type: Supports MongoDB as a source or target database.
- Connection Mode: Choose how you want to connect:
- URI Mode: After selecting this mode, you will be required to provide the necessary information for the database URI connection. The connection string should include the username and password, which are concatenated in the format. For example, the connection string may look like:
mongodb://admin:password@192.168.0.100:27017/mydb?replicaSet=xxx&authSource=admin. - Standard mode: After selecting this mode, you need to fill in the database address, name, account number, password and other connection string parameters.
- URI Mode: After selecting this mode, you will be required to provide the necessary information for the database URI connection. The connection string should include the username and password, which are concatenated in the format. For example, the connection string may look like:
- Advanced Settings
- Use TLS/SSL Connection: Choose according to your business needs:
- TLS/SSL Connection: TapData will connect to a separate server in the network that provides a TLS/SSL channel to the database. If your database is located in an inaccessible subnet, try this method and upload the client private key file, provide the private key password, and choose whether to validate the server certificate.
- Direct Connection: TapData Cloud will connect directly to the database and you need to set up security rules to allow access.
- Number of Sampling Records for Loading Model: Specifies the number of records to sample when loading the schema to ensure that the generated schema structure matches the source data. Default is 1000.
- Fields Load Limit For Each Collection: Limits the maximum number of fields loaded per collection to avoid slow schema generation due to excessive fields. Default is 1024.
- CDC Log Caching: Mining the source database's incremental logs, this feature allows multiple tasks to share incremental logs from the source database, avoiding redundant reads and thus significantly reducing the load on the source database during incremental synchronization. Upon enabling this feature, an external storage should be selected to store the incremental log.
- Contain Table: The default option is All, which includes all tables. Alternatively, you can select Custom and manually specify the desired tables by separating their names with commas (,).
- Exclude Tables: Once the switch is enabled, you have the option to specify tables to be excluded. You can do this by listing the table names separated by commas (,) in case there are multiple tables to be excluded.
- Agent Settings: Defaults to Platform automatic allocation, you can also manually specify an agent.
- Model Load Time: If there are less than 10,000 models in the data source, their schema will be updated every hour. But if the number of models exceeds 10,000, the refresh will take place daily at the time you have specified.
- Enable Heartbeat Table: When the connection type is Source&Target or Source, you can enable this switch. TapData will create a _tapdata_heartbeat_table heartbeat table in the source database and update it every 10 seconds (requires appropriate permissions) to monitor the health of the data source connection and tasks. The heartbeat task starts automatically after the data replication/development task starts, and you can view the heartbeat task in the data source editing page.
- Use TLS/SSL Connection: Choose according to your business needs:
- Connection Settings
Click Test. Once it passes, click Save.
tipIf the connection test fails, please follow the prompts on the page to troubleshoot and resolve the issue.
Node Advanced Features
When configuring data synchronization or transformation tasks with Mongo
DB as the source or target node, TapData provides more advanced features to better meet complex business needs and maximize performance. You can configure these features based on your requirements:
- MongoDB as a Source Node
- MongoDB as a Target Node
| Configuration | Description |
|---|---|
| Document Preimages | Disabled by default. Document Pre-Image refers to the document before it is replaced, updated, or deleted. It is only supported in MongoDB 6.0 and above. When enabled, the UPDATE/DELETE event will record the pre-image, which TapData will use for data synchronization. |
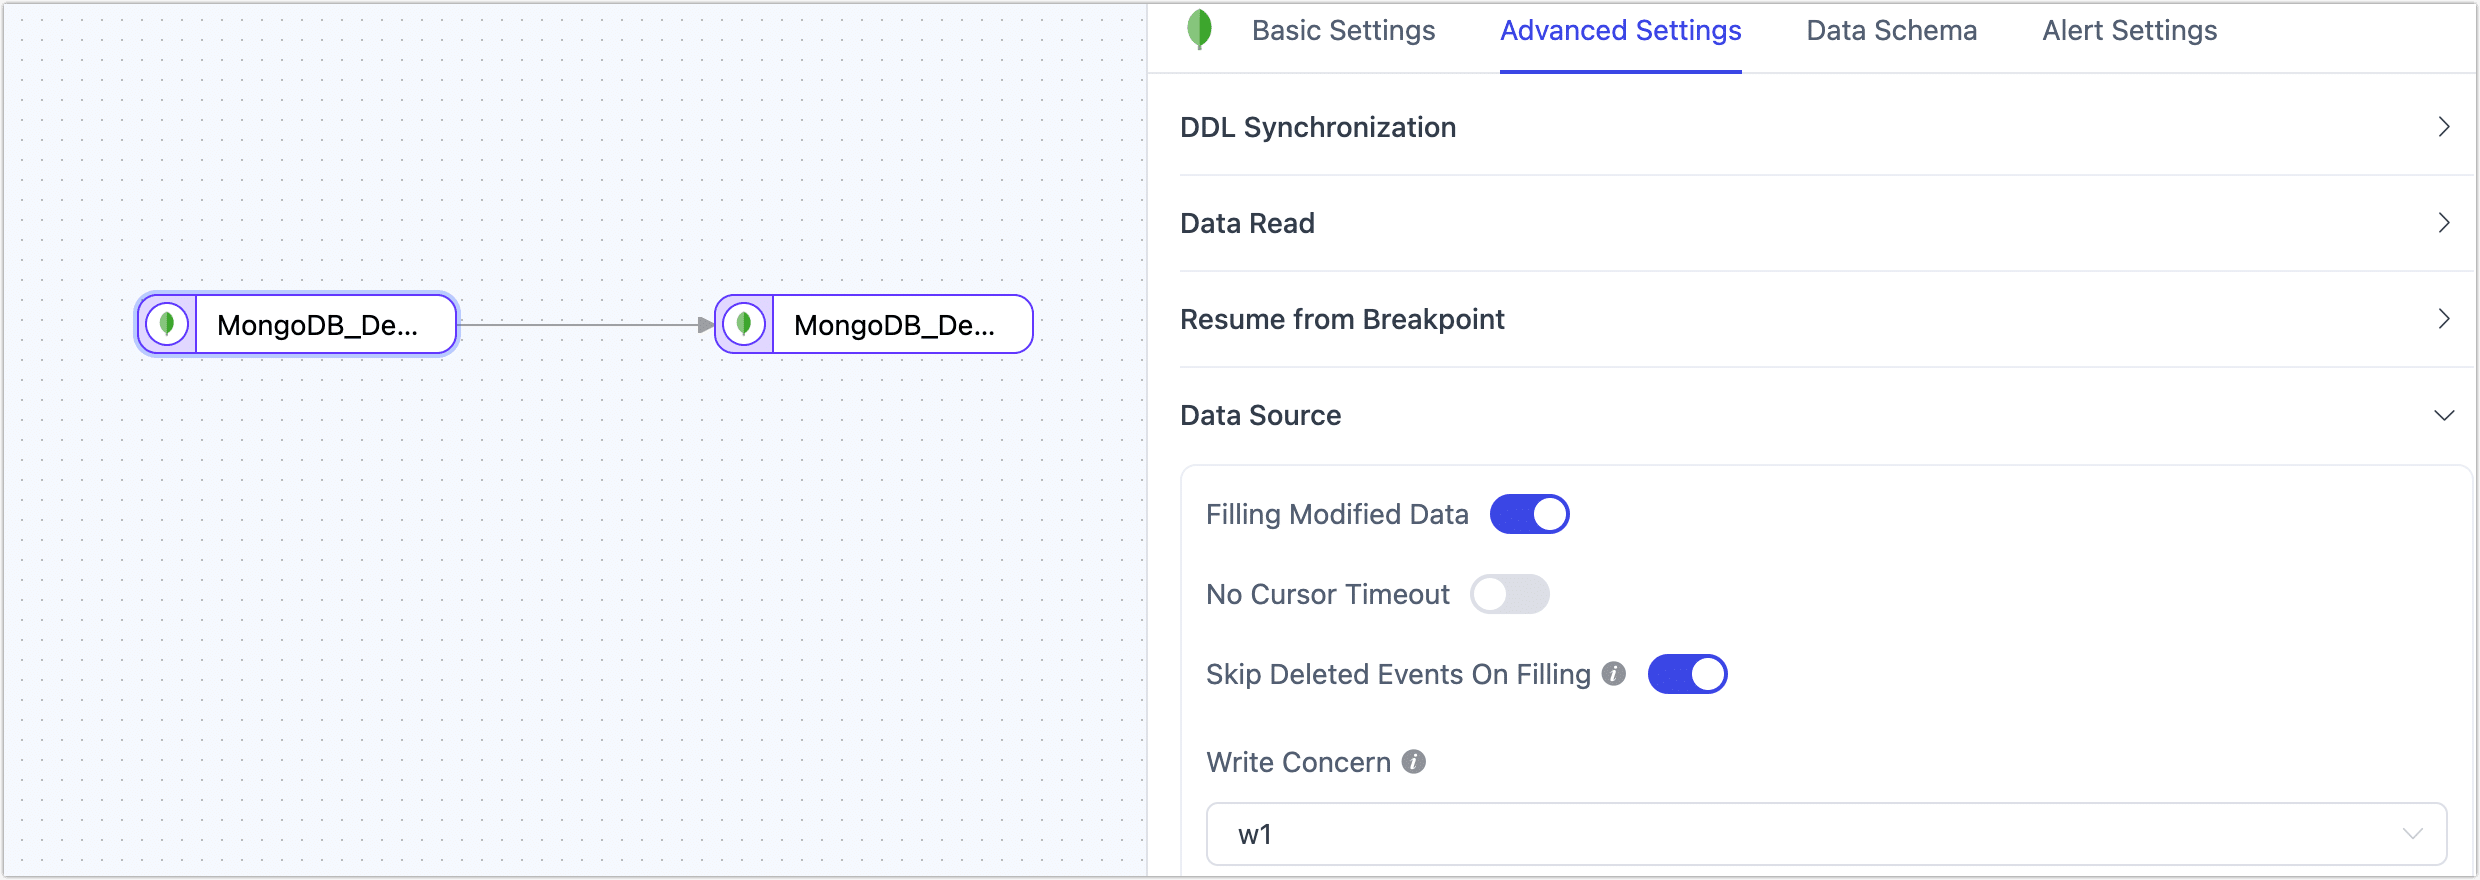
| Filling Modified Data | Enabled by default. When enabled, it automatically fills in complete fields for UPDATE events. |
| Skip Deleted Events On Filling | Enabled by default. Disabling this feature may cause incremental data issues in the following cases: tasks using non-_id fields for business logic; source field type is a sub-document and its attributes are modified; source field type is an embedded array and the PULL operation is executed. |
| No Cursor Timeout | Disabled by default. When enabled, MongoDB will disable cursor timeout to prevent timeout errors during data synchronization. |
| Write Concern | Sets the write concern level. In a sharded cluster, mongos will pass the write concern to the shards. The default value is w1. Options are as follows:● w0 / Unacknowledged: Does not wait for write acknowledgment. Fastest, but cannot confirm whether the write was successful. ● w1 / Acknowledged: Acknowledges successful write to the primary node. Suitable for most scenarios, balancing performance and safety. ● w3: Acknowledges successful write to 3 nodes, increasing data safety. ● majority: Acknowledges successful write to most nodes. High security, but may impact performance if there are many nodes. |
| Configuration | Description |
|---|---|
| Sync Index | Disabled by default. When enabled, indexes from the source database will be automatically synchronized to the target database during the full data synchronization phase. |
| Save Deleted Data | Disabled by default. When enabled, deleted data content will be cached. Since MongoDB delete events only return the _id by default, if the sync condition for the target database (e.g., MySQL) does not include _id, the delete operation may fail. In this case, you can first sync the source table A to an intermediate table A_COPY (using _id as the update condition and enabling this option), then create a new task to sync from A_COPY to the target table B.Note: If Document Preimages is enabled on the source side, delete events can be synced directly without needing an intermediate task. |
| Time-Series Collection Attributes | Disabled by default. When enabled, during synchronization between MongoDB 5.0 and above, time-series collections and their attributes can be synchronized. |
| Write Concern | Sets the write concern level. In a sharded cluster, the mongos service will pass the write concern to the shards. The default value is w1. Options are as follows:● w0 / Unacknowledged: Does not wait for write acknowledgment. Fastest, but cannot confirm whether the write was successful. ● w1 / Acknowledged: Acknowledges successful write to the primary node. Suitable for most scenarios, balancing performance and safety. ● w3: Acknowledges successful write to 3 nodes, increasing data safety. ● majority: Acknowledges successful write to most nodes. High security, but may impact performance if there are many nodes. |
| Sync Partition Properties | Disabled by default. When enabled, sharding attributes are kept consistent during synchronization between MongoDB sharded clusters. |