Deploy HA TapData Enterprise (3 Nodes)
To ensure the reliability of business operations in a production environment, a high availability (HA) deployment is recommended. This guide explains how to deploy TapData services using three servers to achieve high availability.
Deployment Architecture
In this example, we have three servers (as illustrated in the architecture below), each configured with an IP address or hostname. We will deploy MongoDB services (to store information required for TapData operations) and complete TapData services (including management services, data synchronization governance services, and API services) on each of these servers to achieve overall service high availability.
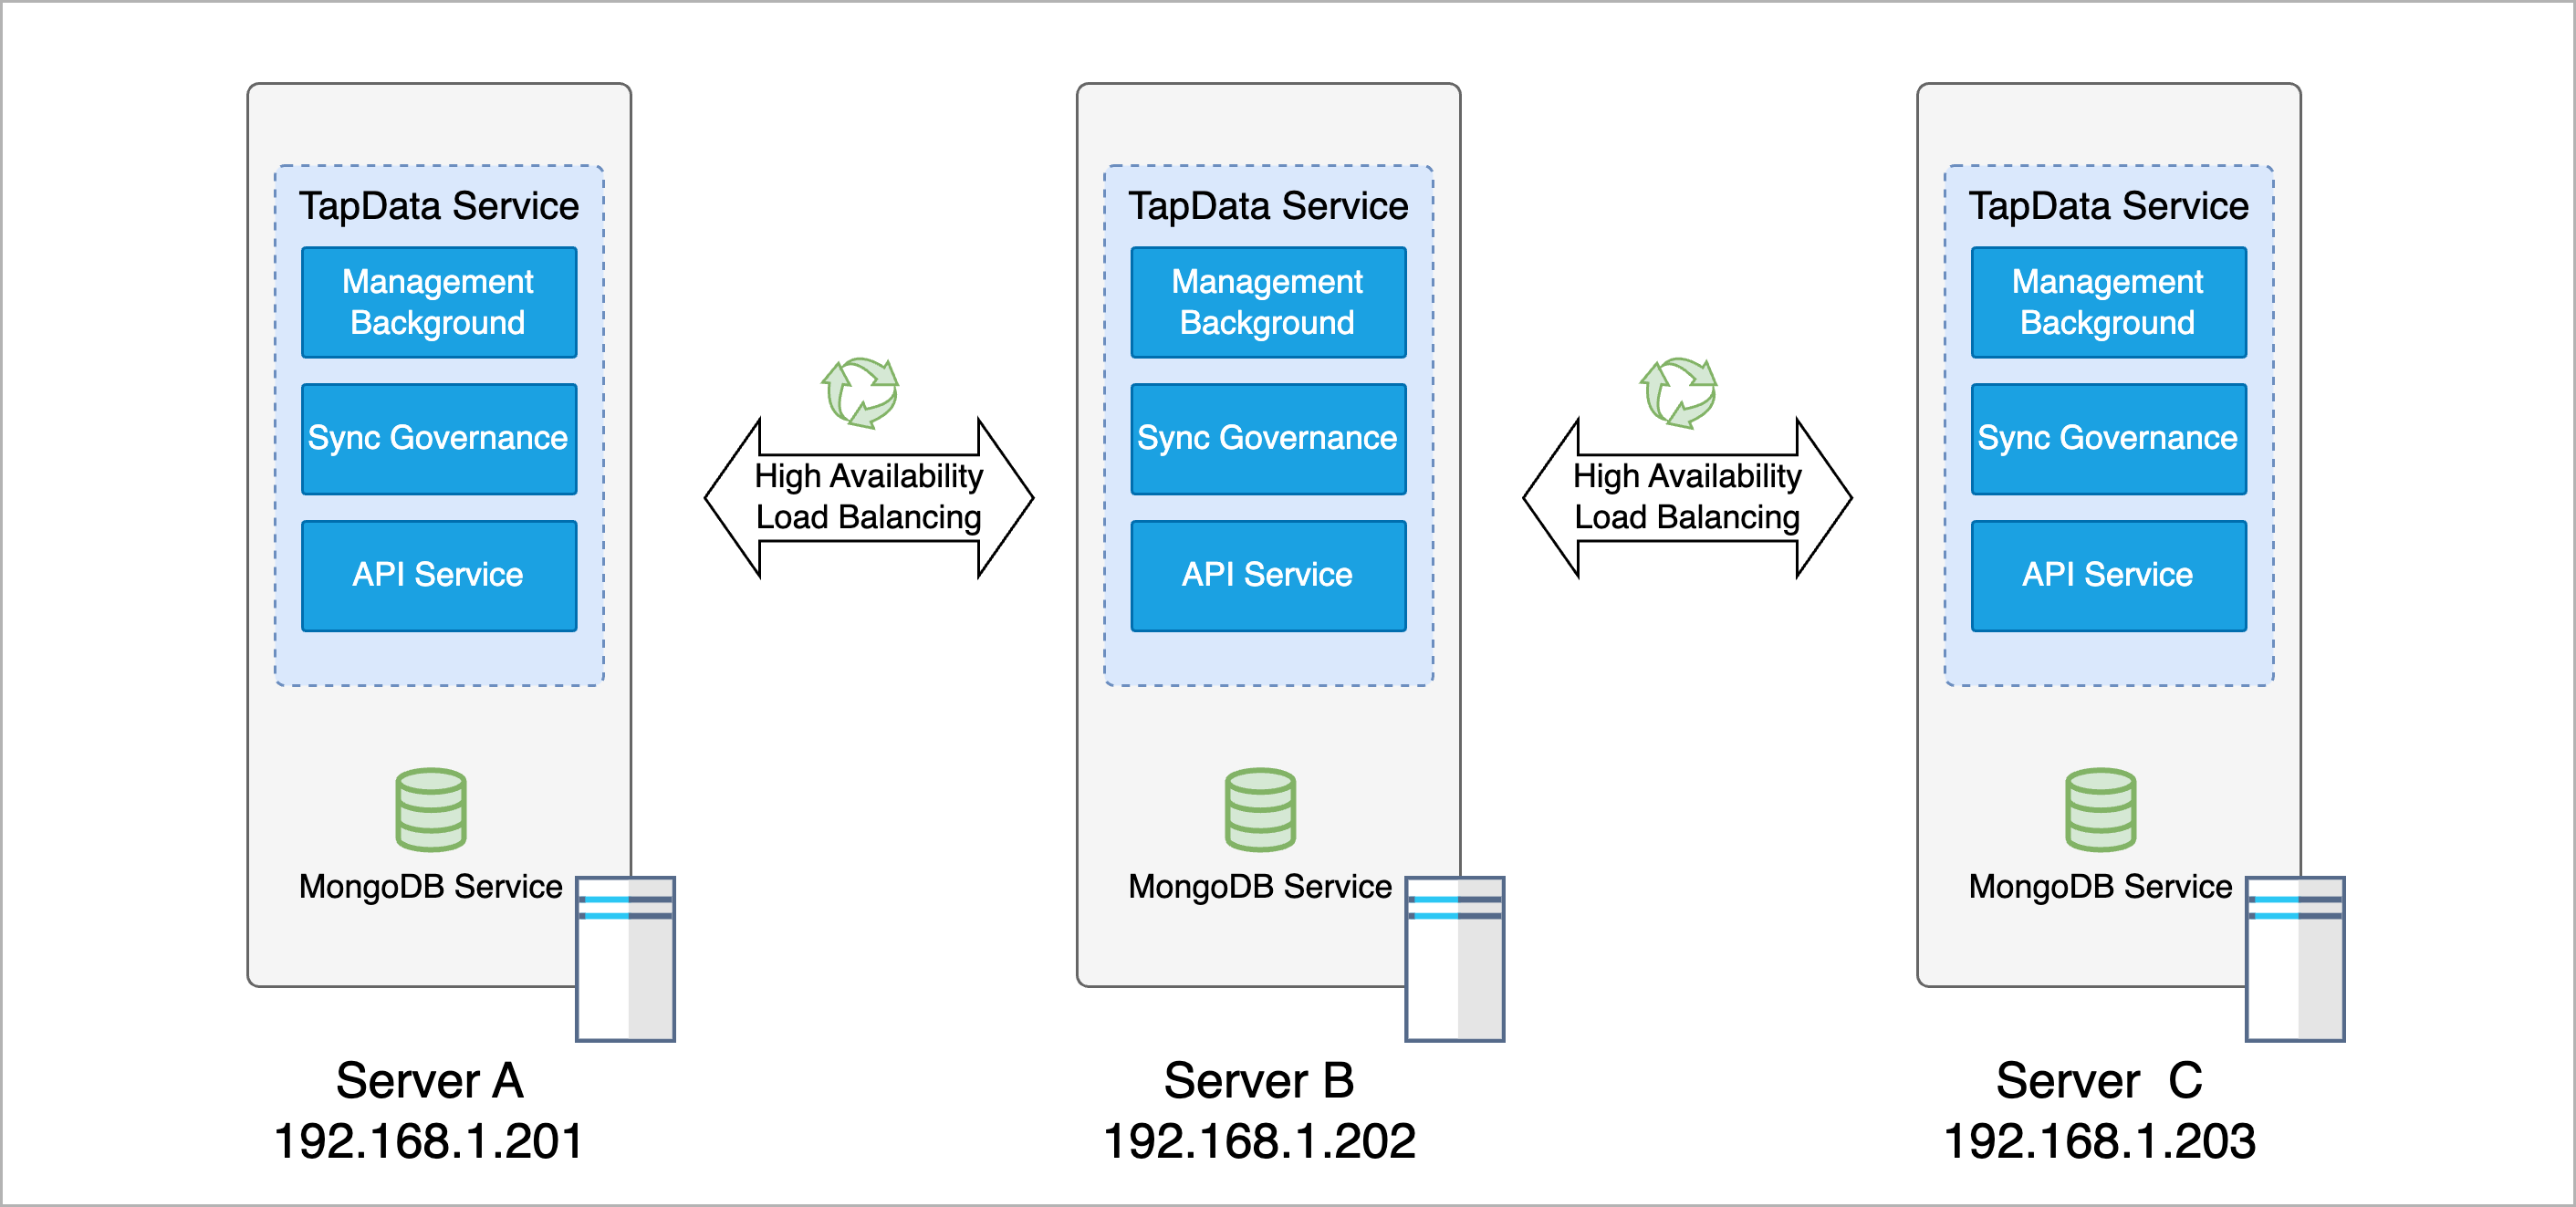
In this example, each server is equipped with a 16-core CPU and 32 GB of RAM. The recommended minimum hardware configuration is an 8-core CPU with 16 GB of RAM, and the operating system should be CentOS 7+ or Ubuntu 16.04+.
| Service | Service Port | Role Description | Resource Planning |
|---|---|---|---|
| Management Service | 3030 | Provides task management services; low memory usage during task execution and low load requirements | Recommended 18% of total memory: 32*0.18 = 5.76, rounded up to 6 GB |
| Synchronization Governance Service | Not applicable | Executes data synchronization/transformation tasks and related processing nodes, requires significant computing and memory resources | Recommended 35% of total memory: 32*0.35 = 11.2, rounded up to 12 GB |
| API Service | 3080 | Publishes table data as APIs, provides calling and management services. Automatically allocates system resources, typically using around 100 MB per process | Default number of worker processes is the number of CPU cores; adjust based on API service load |
| MongoDB Service | 27017 | Stores essential configurations for TapData tasks, shared cache, and other information | Recommended 30% of total memory: 32*0.3 = 9.6, rounded up to 10 GB |
Preparation
Before deployment, perform the following steps on each of the three servers. This guide uses CentOS 7 as an example to demonstrate the deployment process.
Log in to the server and run the following commands to configure system parameters such as file access numbers and the firewall.
ulimit -n 1024000
echo "* soft nofile 1024000" >> /etc/security/limits.conf
echo "* hard nofile 1024000" >> /etc/security/limits.conf
systemctl disable firewalld.service
systemctl stop firewalld.service
setenforce 0
sed -i "s/enforcing/disabled/g" /etc/selinux/config
Run the following command to install Java 1.8.
yum -y install java-1.8.0-openjdkEnsure consistent machine time and time zone settings across all servers.
Deploy a MongoDB Replica Set to store necessary configurations and shared cache generated by the Tapdata services.
tipAdjust MongoDB's resource configuration based on the server specifications. In this example, the
cacheSizeGBis set to10, andoplogSizeMBis set to51200. For more configuration details, refer to MongoDB Configuration File Options.
Install Services
The following operations need to be performed separately on each of the three servers to complete the deployment process.
Obtain the License file.
Run the following command to get the SID information required for the license application.
java -cp components/tm.jar -Dloader.main=com.tapdata.tm.license.util.SidGenerator org.springframework.boot.loader.PropertiesLauncherProvide the printed SID information to the TapData support team to complete the license application process.
Upload the acquired License file to the extracted directory (named tapdata).
Download the TapData installation package (contact Tapdata for access) and upload it to the target deployment device.
On all target devices, run the following commands to create the installation and working directories, and extract the TapData installation package into the directory.
# Create installation and working directories
mkdir -p /data/tapdata/tapdata_work
# Extract the installation package (replace the package name with the actual name)
tar -zxvf installation-package-name -C /data/tapdata
Navigate to the extracted directory and run the
./tapdata startcommand to start the TapData deployment process. Follow the command line prompts to set up TapData's login address, API service port, MongoDB connection authentication, and other settings. An example setup is provided below:tipIf deploying as a non-root user, avoid using
sudoto prevent installation failures. Before running commands, grant full permissions to the current user for the installation directory usingsudo chown -R <your-username>:<your-group> <installation-dir>orsudo chmod -R 777 <installation-dir>../tapdata start
_______ _____ _____ _______
|__ __|/\ | __ \| __ \ /\|__ __|/\
| | / \ | |__) | | | | / \ | | / \
| | / /\ \ | ___/| | | |/ /\ \ | | / /\ \
| |/ ____ \| | | |__| / ____ \| |/ ____ \
|_/_/ \_\_| |_____/_/ \_\_/_/ \_\
WORK DIR:/root/tapdata
Init tapdata...
# Set TapData management interface address list
✔ Please enter backend url, comma separated list. e.g.:http://127.0.0.1:3030/ (Default: http://127.0.0.1:3030/): … http://192.168.1.201:3030,http://192.168.1.202:3030,http://192.168.1.203:3030
# Set TapData service port (default is fine)
✔ Please enter tapdata port. (Default: 3030): …
✔ Please enter api server port. (Default: 3080): …
# MongoDB authentication
✔ Does MongoDB require username/password?(y/n): … y
# Enter MongoDB username, password, and authentication database if applicable (default is admin)
✔ Does MongoDB require TLS/SSL?(y/n): … no
# Set MongoDB connection string
✔ Please enter mongodb connection string without username and password (Default: mongodb://127.0.0.1:27017/tapdata)
mongodb://192.168.1.201:27017,192.168.1.202:27017,192.168.1.203:27017/tapdata
✔ Does API Server response error code?(y/n): … yes
System initialized. To start Tapdata, run: tapdata start
WORK DIR:/data/tapdata/tapdata_work
Testing JDK...
java version:1.8
Java environment OK.
Unpack the files...
frontend server started.begin deploy init
Try to connect to TM for deploy connector...
deploy connector...- Please enter backend url: Enter the TapData platform login address. In this example, set the login addresses for servers A, B, and C, separated by commas:
http://192.168.1.201:3030,http://192.168.1.202:3030,http://192.168.1.203:3030 - Please enter tapdata port: Enter the TapData platform login port, default is
3030. - Please enter api server port: Enter the API server port, default is
3080. - Does MongoDB require username/password?: Specify if MongoDB uses authentication. Enter n if not, or y if yes, and provide the MongoDB username, password, and authentication database (default is
admin). - Does MongoDB require TLS/SSL?(y/n): Specify if MongoDB uses TLS/SSL encryption. Enter n if not, or y if yes, and provide paths to the CA certificate and Certificate Key files, along with the password for the Certificate Key.
- Please enter MongoDB host, port, database name: Enter the MongoDB URI connection information. In this example, enter:
mongodb://192.168.1.201:27017,192.168.1.202:27017,192.168.1.203:27017/tapdata. - Does API Server response error code?: Specify if the API server should respond with error codes.
Upon successful deployment, the command line will display output similar to the following:
deployed connector.
Waiting for the flow engine to start \
FlowEngine is startup at : 2023-04-01 23:10
API service started- Please enter backend url: Enter the TapData platform login address. In this example, set the login addresses for servers A, B, and C, separated by commas:
Adjust TapData memory resource settings. In this example, each server has 32 GB of memory, and MongoDB is allocated 8 GB, leaving 24 GB of available memory. The settings and descriptions are as follows:
tapdataTMJavaOpts: Controls the memory usage limit for the Management Service, typically set to around 18% of total memory. In this example, set it to"-Xms6G -Xmx6G".tapdataJavaOpts: Controls the memory usage limit for the Sync Governance Service, typically set to 35% of total memory. In this example, set it to"-Xms12G -Xmx12G".apiWorkerCount: Controls the number of workers in the API service. The default is the number of CPU cores. It can be adjusted based on the API service load; in this example, it is set to4.
Set TapData services to start automatically on boot.
Navigate to the
/usr/lib/systemd/systemdirectory, create a new service file using a text editor (e.g.,vim), and name ittapdata.service. Paste the following content into the file.[Unit]
Description=Tapdata Service
After=network.target
[Service]
Type=simple
User=root
# Set the paths according to the tapdata installation path
ExecStart=/data/tapdata/tapdata start
ExecStop=/data/tapdata/tapdata stop
Restart=on-failure
[Install]
WantedBy=multi-user.targetLoad the new service file and enable it to start automatically on boot:
sudo systemctl daemon-reload
sudo systemctl enable tapdata.service
(Optional) During low business activity periods, reboot the machine and check if the TapData service starts correctly using
systemctl status tapdata.service.
Log in to TapData
After completing the above deployment steps on all three servers, you can log in to the management interface using http://192.168.1.201:3030, http://192.168.1.202:3030, or http://192.168.1.203:3030 from any device on the same intranet. If local DNS is configured, you can log in using the corresponding server hostname.
For security, change your password upon first login.
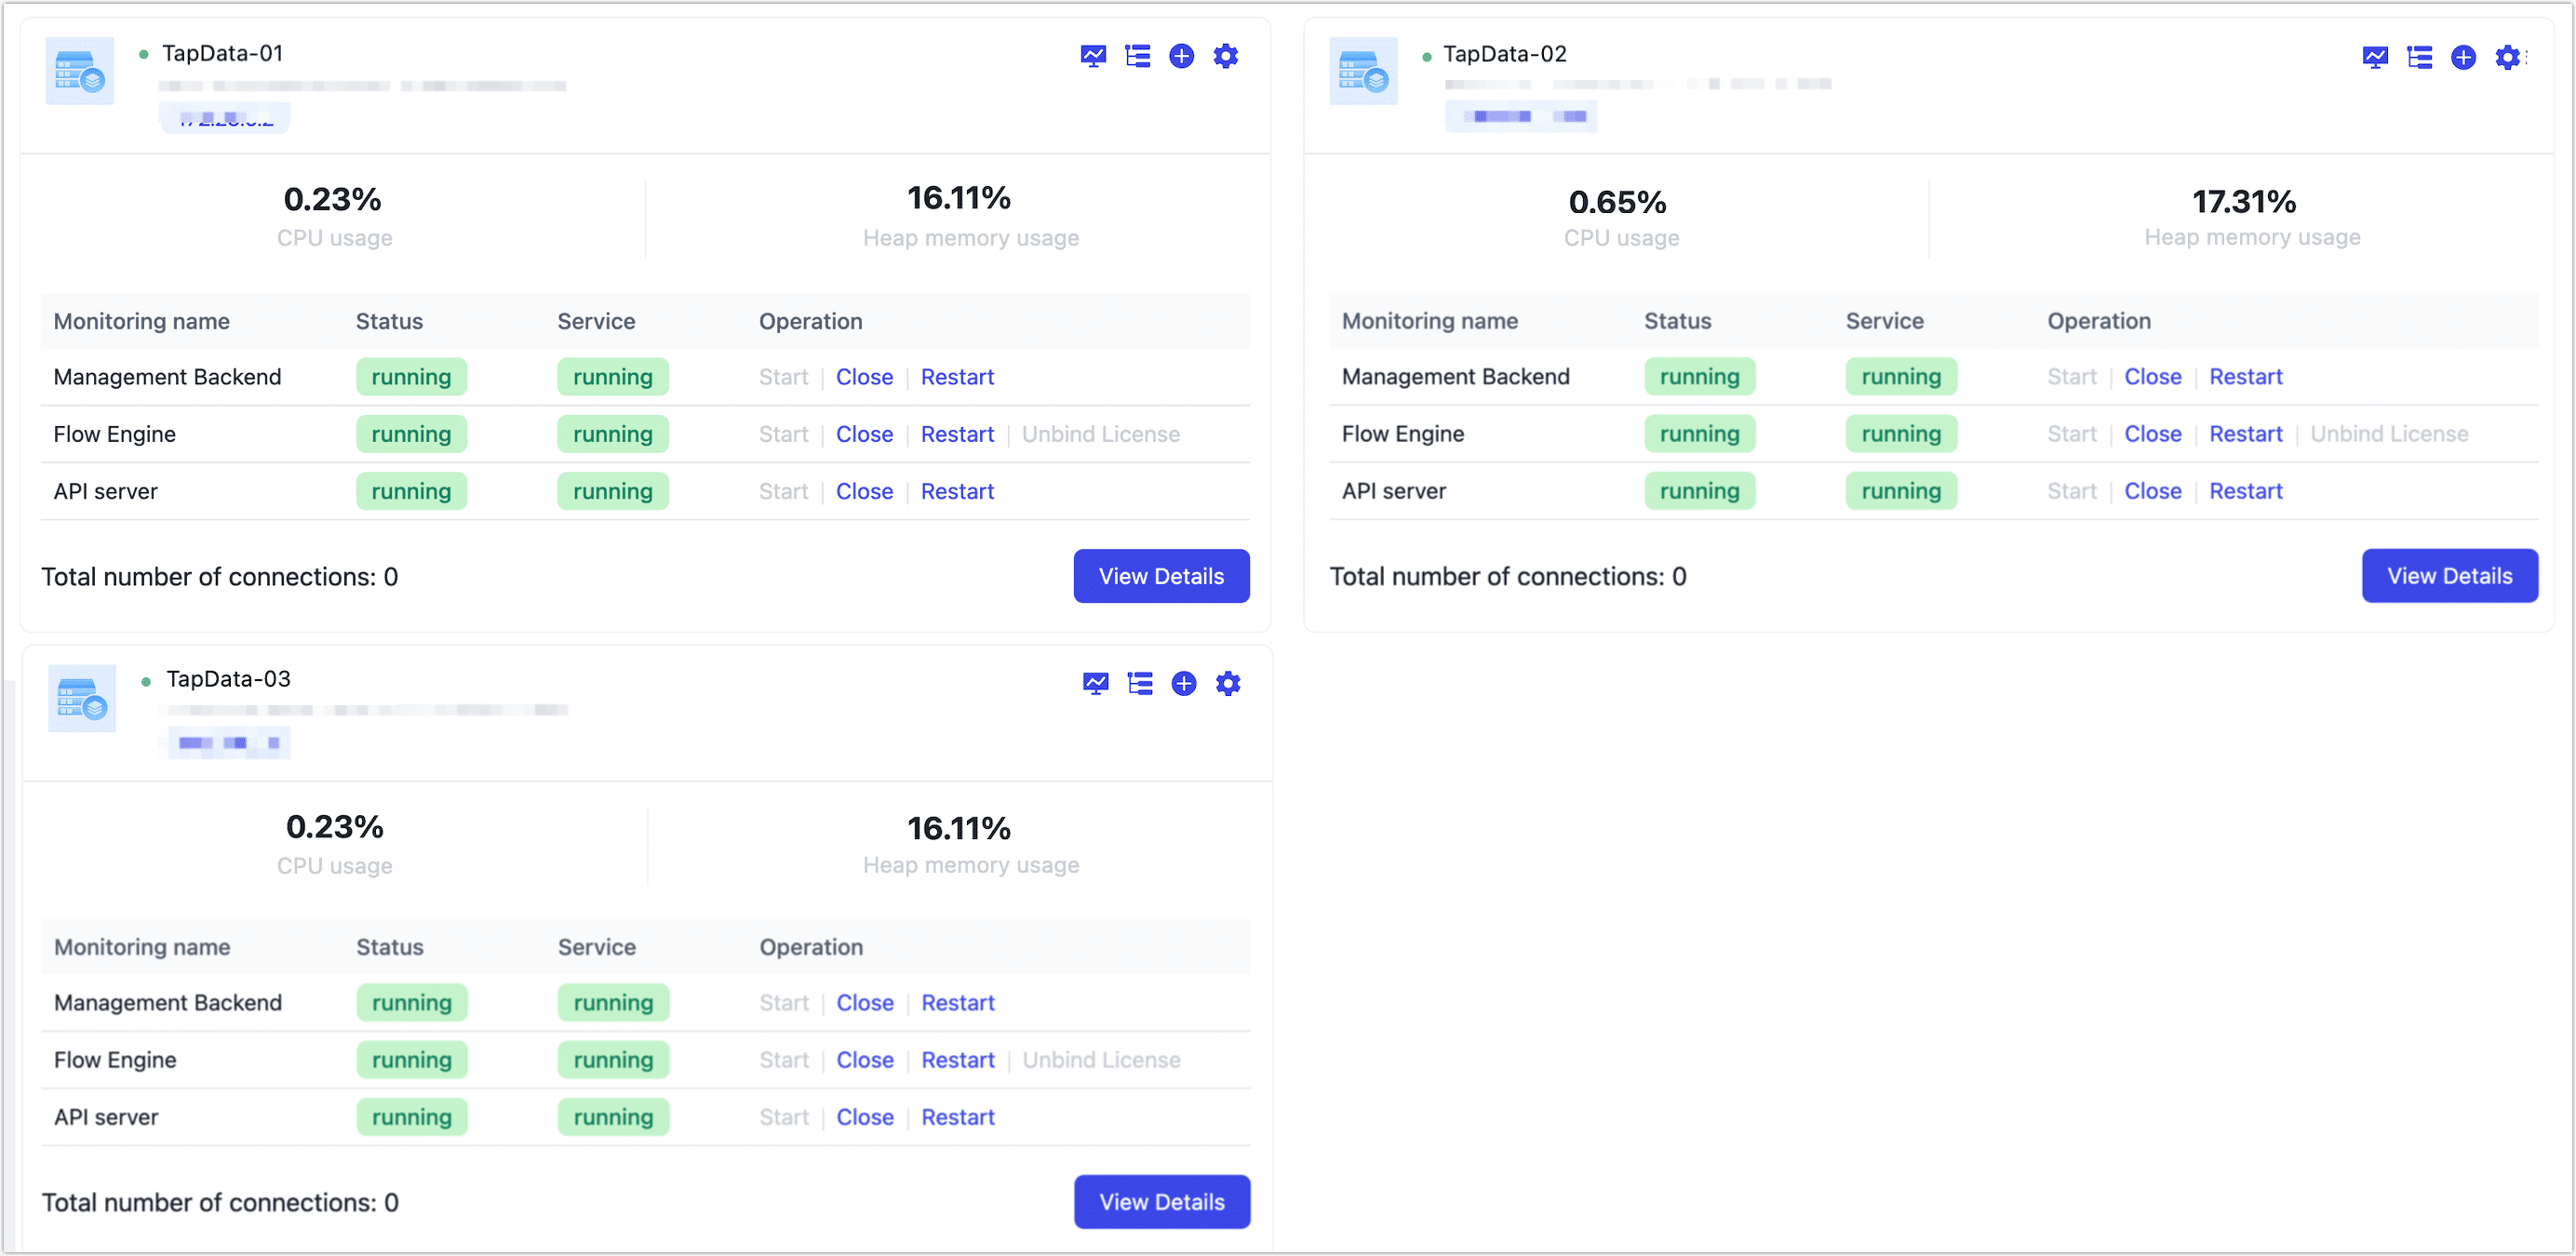
Upon successful login, you can view the status of the TapData services on all three servers under System Management > Cluster Management.