Getting Started
This guide demonstrates how to use TapFlow to build a basic data flow task, helping you quickly understand data replication and stream processing workflows. For more complex business needs, such as multi-table processing to create real-time wide tables, refer to Typical Use Cases.
Step 1: Install TapShell
Download and start TapShell.
- Source Installation
- Binary Installation
Download and install Python 3, version 3.6 or higher.
Run the following command to create a virtual environment. This isolates dependencies and avoids conflicts with the system Python environment.
python3 -m venv tapflow_envRun the following commands to activate the virtual environment, and install TapShell along with its dependencies.
# Activate the virtual environment
source tapflow_env/bin/activate

# Install TapShell
pip3 install tapflow
# Or
pip install tapflow
The installation is now complete. Before using TapShell again after exiting the command line, you need to activate the virtual environment. Alternatively, you can install TapFlow using pipx. Simply run
pipx install tapflow, and pipx will automatically create and manage the virtual environment for you.Enter
tapto start TapShell.
Download the corresponding binary package based on your operating system:
Start TapShell.
Ubuntu 20.04 +: Grant execution permissions and start TapShell.
chmod +x tap-shell
./tap-shell
Windows: Double-click
tap-shell.exeto start TapShell.
Select your deployment type and configure the required authentication information. For this example, we’ll connect to TapData Cloud:
Tap Flow requires TapData Live Data Platform (LDP) cluster to run.
If you would like to use with TapData Enterprise or TapData Community, type L to continue.
If you would like to use TapData Cloud, or you are new to TapData, type C or press ENTER to continue.

(if selected L)
Please enter server:port of TapData LDP server:
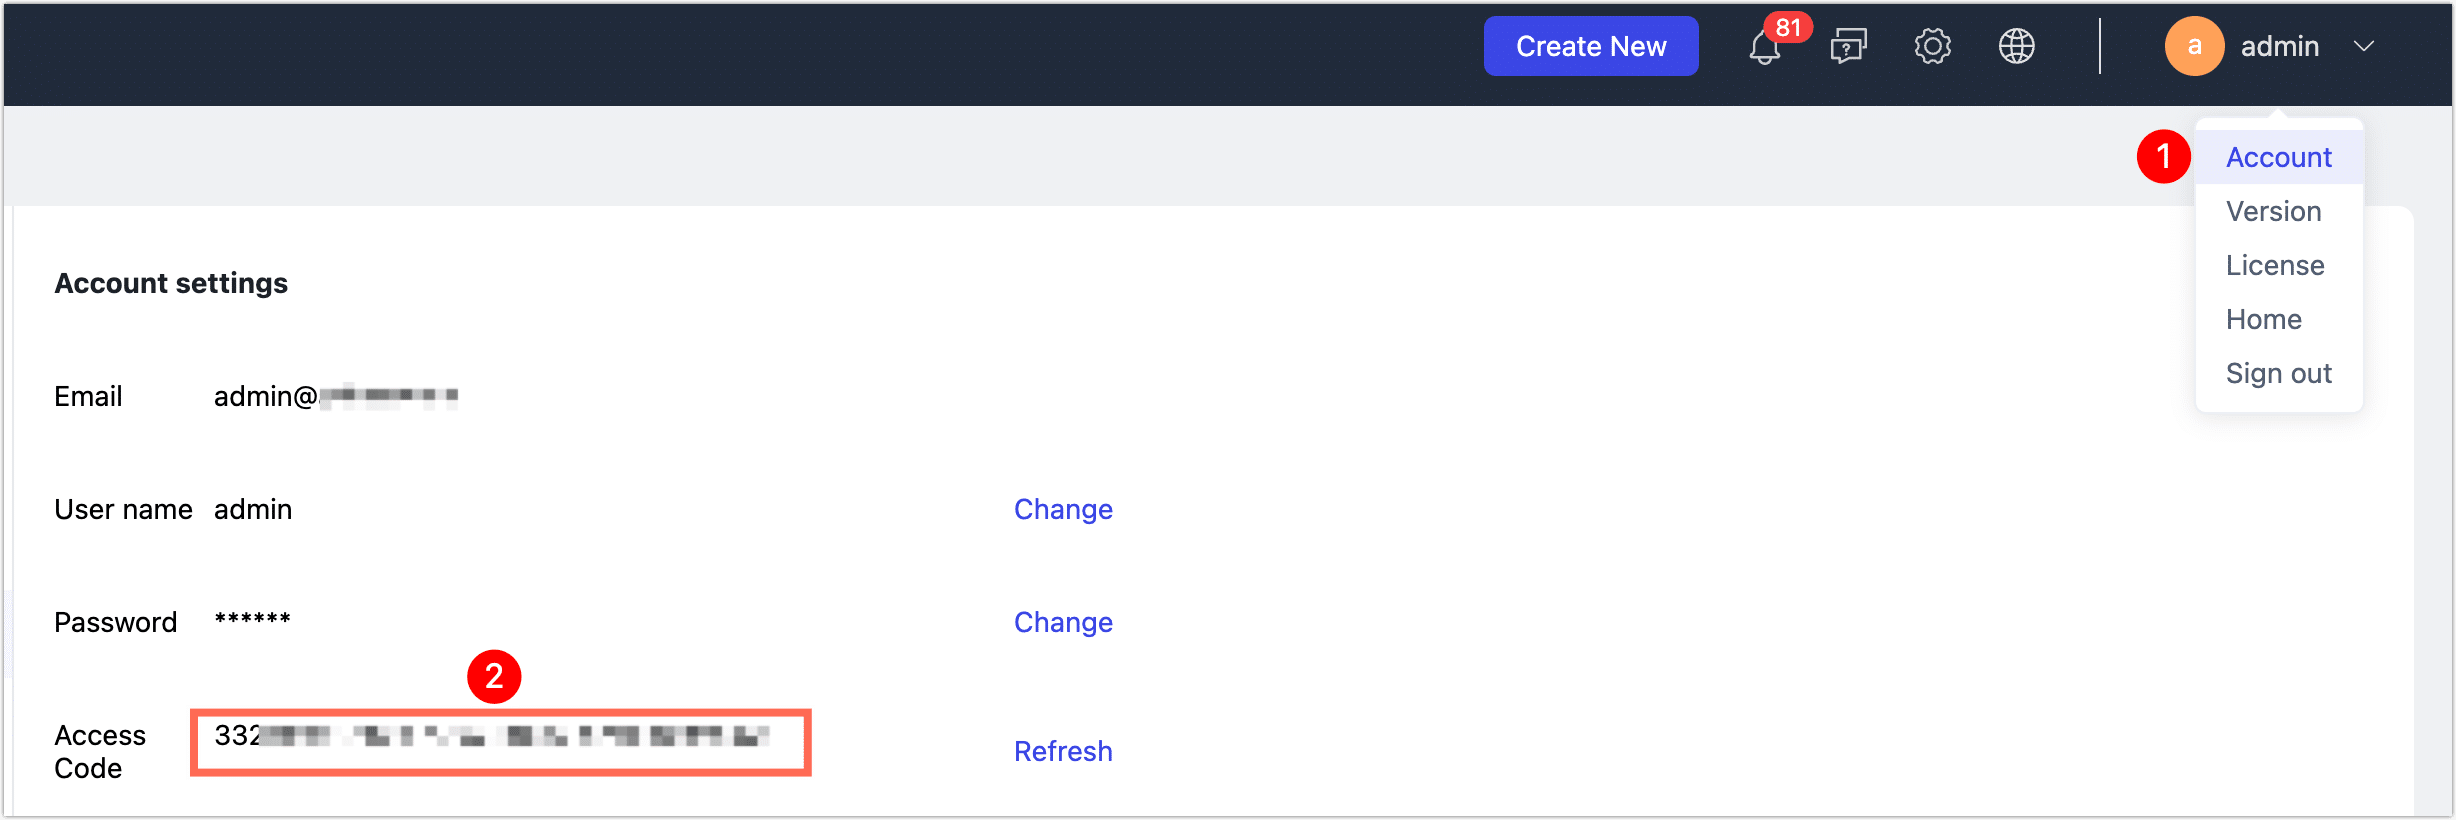
Please enter access code

(if pressed enter/C)
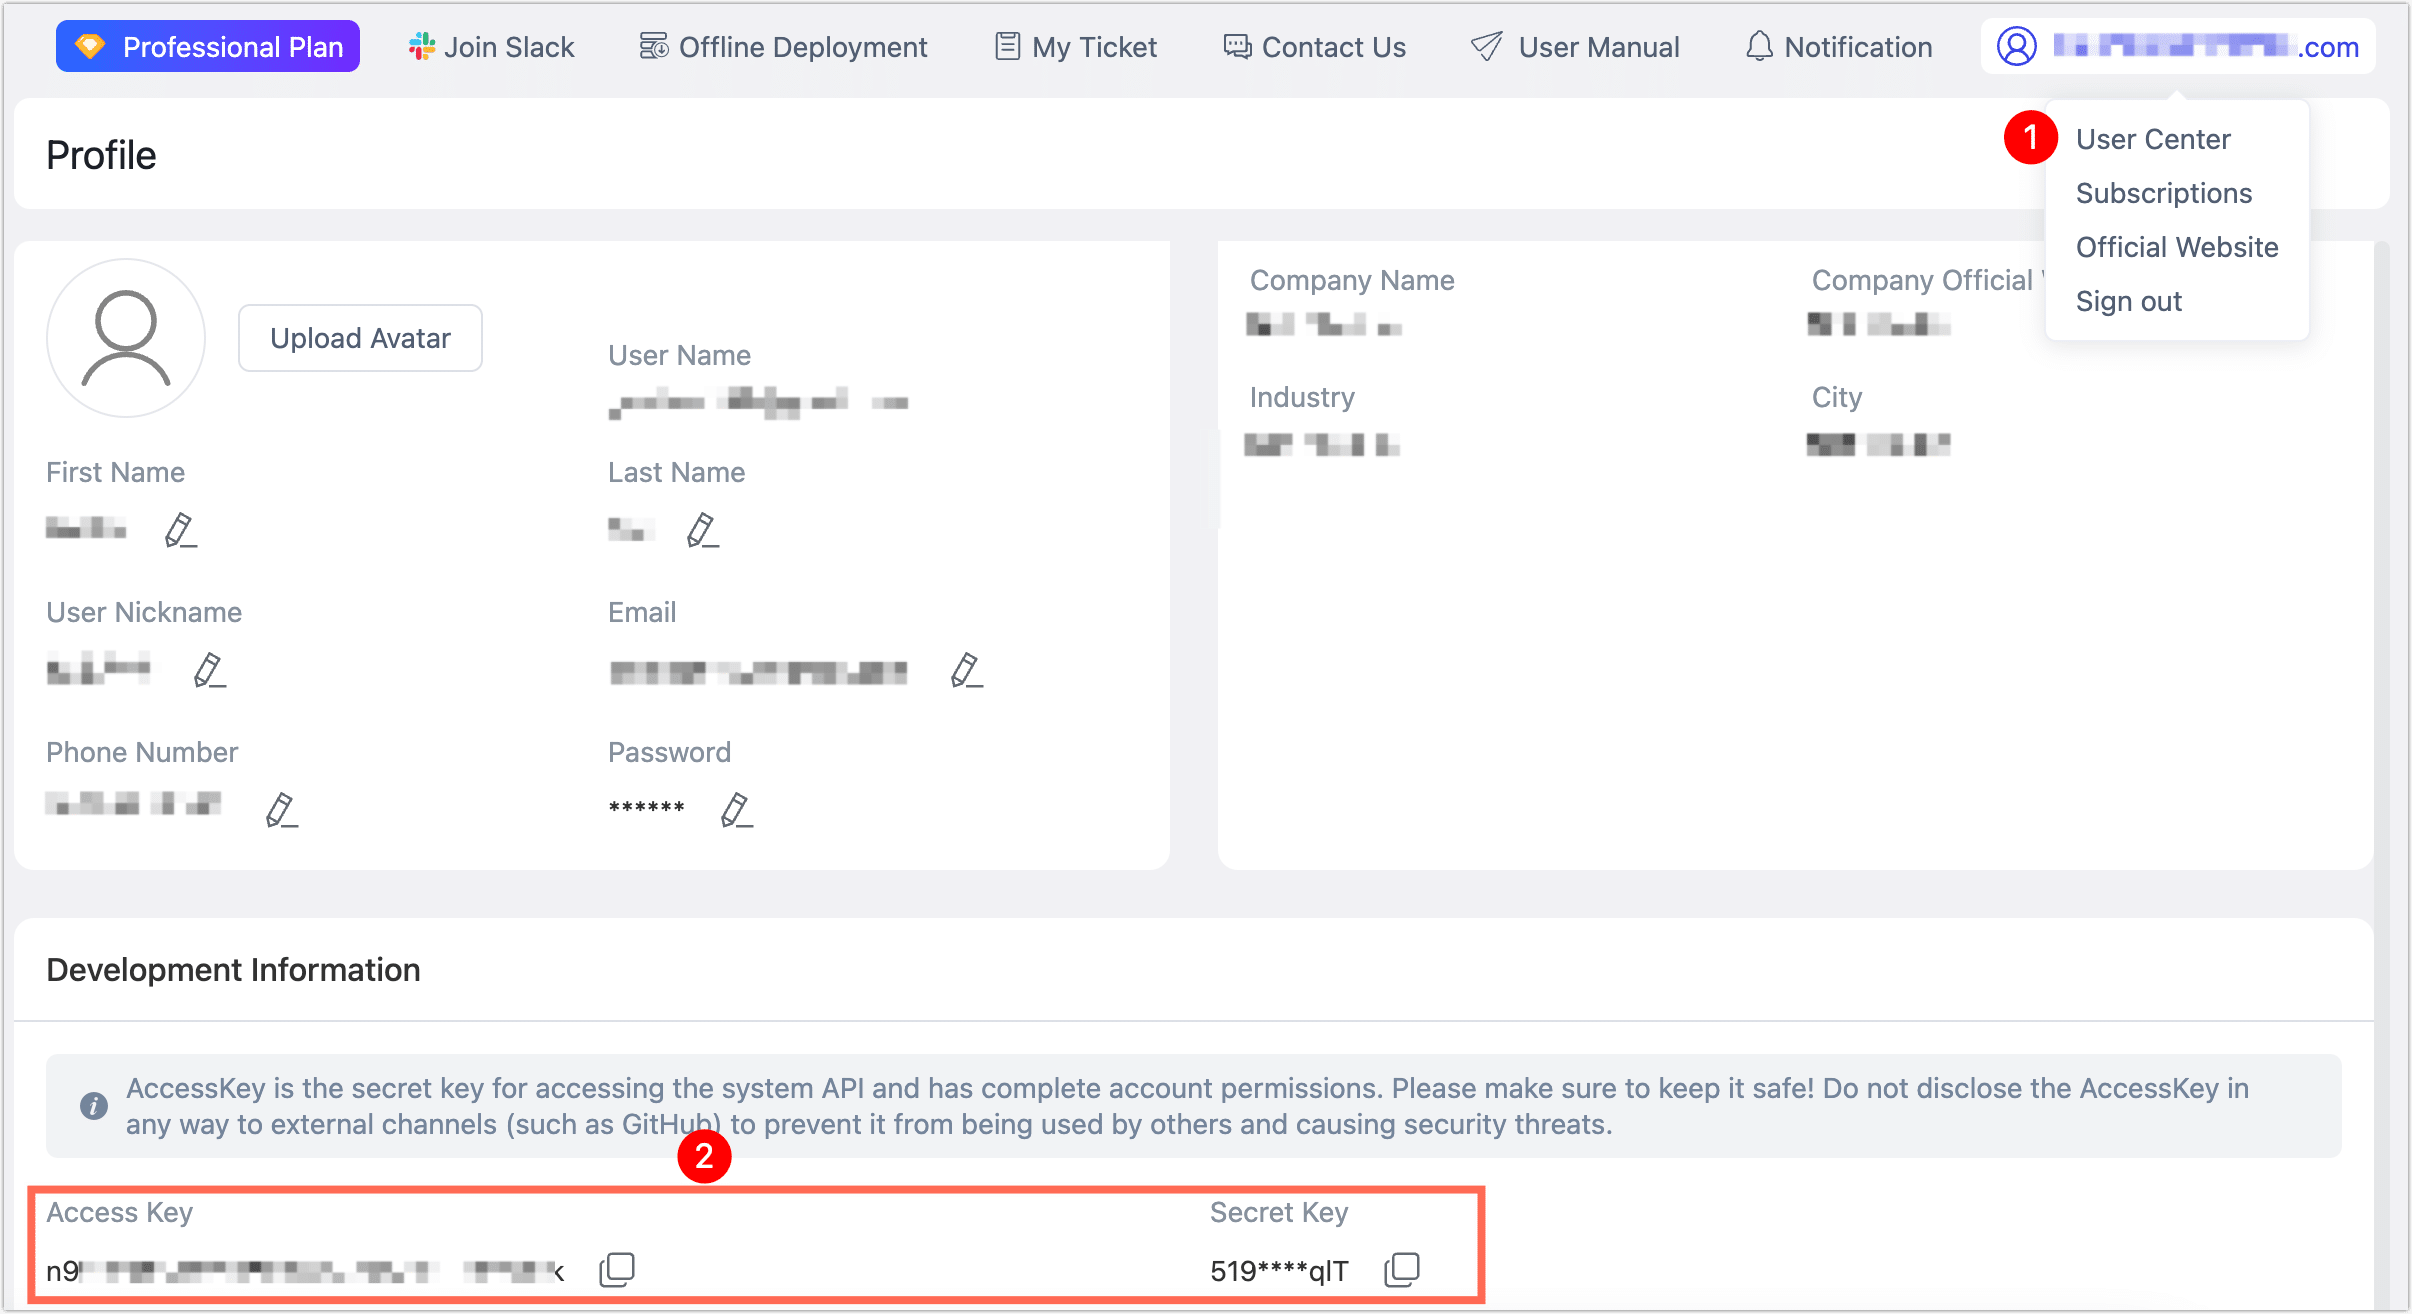
# You may obtain the keys by logging onto TapFlow Cloud, and clicking: "User Center" on the top right, then copying & pasting the access key and secret key pair.
# You can sign up for a new account from: https://cloud.tapdata.io if you don't have one
Enter AK:
Enter SK:- Press
Cor Enter to connect to TapData Cloud, then input your Access Key and Secret Key. - Press
Lto connect to a locally deployed TapData Enterprise platform, then input the server address and access code.
How to obtain access keys?
- Press
Once authentication is verified, the command line will print a welcome message and display Agent information, indicating a successful connection. You can view help options with the h command.
Mon Oct 21 15:53:50 CST 2024 connecting remote server: https://cloud.tapdata.net ...
Mon Oct 21 15:53:50 CST 2024 Welcome to TapData Live Data Platform, Enjoy Your Data Trip!
========================================================================================================================
TapData Cloud Service Running Agent: 1
Agent name: agent-192*****67, ip: 172.17.0.3, cpu usage: 16%
By default, TapFlow generates the configuration file at ~/.tapflow/config.ini. You can modify this file to update authentication details or specify a custom configuration file path using tap -c <filename>.
Step 2: Create a Data Flow Task
After configuring the data sources, you can create a data flow to synchronize MySQL data to MongoDB using either of the following methods:
- Using Interactive Shell: Define and adjust data flows directly through the command line interface in real-time. Ideal for quick testing and building simple tasks.
- Using Python Script: Use Python code to control data flow logic, enabling easy saving, reuse, and version management. Best suited for complex scenarios requiring dynamic task creation and automated deployment.
What is a Data Flow?
- Using Interactive Shell
- Using Python Script
Next, configure your data sources via TapShell. In this example, we’ll use MySQL as the source database and MongoDB as the target.
Run the following command to add a MySQL data source named
MySQL_ECommerce.# Define a dictionary variable mysql_json_config to store MySQL connection configuration
mysql_json_config = {
'database': 'ECommerceData', # Database name
'port': 3306, # MySQL port, typically 3306
'host': '192.168.1.18', # MySQL host address
'username': 'your_username', # Database username
'password': 'your_passwd' # Database password
}
# Create a data source connection object mysql_conn, referencing mysql_json_config configuration and saving as source
mysql_conn = DataSource('mysql', 'MySQL_ECommerce', mysql_json_config).type('source').save()Once configured, the connection information is saved to the TapData platform, which will automatically test the connection and load its schema. Example output:
datasource MySQL_ECommerce creating, please wait...
save datasource MySQL_ECommerce success, will load schema, please wait...
load schema status: finished
Use the following command to add MongoDB as the target database, saved as
MongoDB_ECommerce.# Define a dictionary variable mongodb_json_config to store MongoDB URI connection information
mongodb_json_config = {
"uri": "mongodb://your_username:your_passwd@192.168.1.18:27017/ecommerce?authSource=admin"
}
# Create a data source connection object mongodb_conn, referencing mongodb_json_config configuration and saving as target
mongodb_conn = DataSource("mongodb", "MongoDB_ECommerce", mongodb_json_config).type("target").save()tip- TapData supports many popular data sources, with slight configuration differences depending on the source. For more on permissions and parameters, see Connecting Data Sources.
- If you receive a “load schema status: error” error, it’s typically a permission or configuration issue. Retrying with the same name will overwrite the previous configuration with “database MongoDB_ECommerce exists, will update its config.”
Create a data flow task named MySQL_to_MongoDB_Order_Sync to synchronize order data from MySQL to MongoDB.
# Create a data flow task object and specify the source and target tables
myflow = Flow("MySQL_to_MongoDB_Order") \
       .read_from("MySQL_ECommerce.ecom_orders") \
       .write_to("MongoDB_ECommerce.orders_collection") \
       .save()
In this example,
read_fromspecifies MySQL’secom_orderstable as the data source, whilewrite_tosets MongoDB’sorders_collectionas the target. The task is saved in a pending state with the following prompt:Flow updated: source added
Flow updated: sink addedStart the sync task. TapData will automatically perform a full sync, then transition to incremental sync, capturing real-time changes in the source table and syncing to the target.
myflow.start()The system will confirm task status, e.g.:
Task start succeedDuring task operation, you can check the status and statistics with the command:
stats MySQL_to_MongoDB_OrderExample output:
job current status is: running, qps is: 0.0, total rows: 198881, delay is: 253msAdditionally, you can monitor progress or debug with
logs <flow name/id>.(Optional) To stop the sync task, use
stop <flow name/id>.
By using a programming approach, you can flexibly define and manage data flows. The following example demonstrates how to create a data flow from MySQL to MongoDB using Python.
Import the required modules and and initialize the configuration settings in your Python script:
from tapflow.lib import *
from tapflow.cli.cli import init
init()Define the connection configurations for the source database (MySQL) and the target database (MongoDB), and create their respective connection objects:
# Define the connection configuration for the MySQL data source
mysql_config = {
'database': 'ECommerceData',
'port': 3306,
'host': '192.168.1.18',
'username': 'your_username',
'password': 'your_password'
}
# Create the MySQL data source object and save it as a source database
mysql_source = DataSource('mysql', 'MySQL_ECommerce', mysql_config).type('source').save()
# Define the connection configuration for the MongoDB data source
mongodb_config = {
'uri': 'mongodb://your_username:your_password@192.168.1.18:29917/ecommerce?authSource=admin'
}
# Create the MongoDB data source object and save it as a target database
mongodb_target = DataSource('mongodb', 'MongoDB_ECommerce', mongodb_config).type('target').save()Define and save a data flow to synchronize data from the
ecom_orderstable in MySQL to theorders_collectioncollection in MongoDB:# Create a data flow task
flow = Flow("MySQL_to_MongoDB_Order_Sync")
flow.read_from("MySQL_ECommerce.ecom_orders")
flow.write_to("MongoDB_ECommerce.orders_collection")
# Save the data flow configuration
flow.save()Start the data flow task. You can directly start the task within the script using the method below, or choose to start it through TapShell or other external schedulers to accommodate different business needs.
# Start the data flow task
flow.start()
print("The data flow task has started.")(Optional) Monitor the task status using the following code:
# Output the task status
while True:
status = flow.status()
if status == "running":
print(f"Task status: {status}")
break
elif status == "error":
print("Task failed to start. Please check the configuration or logs.")
breakCombine the above code into a single script, save it as
ecom_flow.py, and run it with the following command:python ecom_flow.pyExample output:
datasource MySQL_ECommerce creating, please wait...
save datasource MySQL_ECommerce success, will load schema, please wait...
load schema status: finished
datasource MongoDB_ECommerce creating, please wait...
save datasource MongoDB_ECommerce success, will load schema, please wait...
load schema status: finished
Flow updated: source added
Flow updated: sink added
The data flow task has started.
Task status: running

