Install on Windows
This guide explains how to quickly deploy TapData services on a Windows platform.
Stand-alone deployment is suitable for functional testing scenarios. For production environments, it is recommended to use high-availability deployment.
Hardware & Software Requirements
- CPU: 8 cores
- Memory: 16 GB
- Storage Space: 100 GB
- Operating System: Windows OS (64-bit)
Preparation
Install MongoDB (version 4.0 and above), which will serve as the storage system for TapData to run related data, such as logs and metadata. For more information, see Deploy MongoDB Replica Set.
Log in to the target device, install Java 1.8 and set environment variables.
Download Java 1.8 and follow the prompts to complete the installation.
Go to Control Panel > System and Security > System.
Click Advanced System Settings on the left, then click Environment Variables.
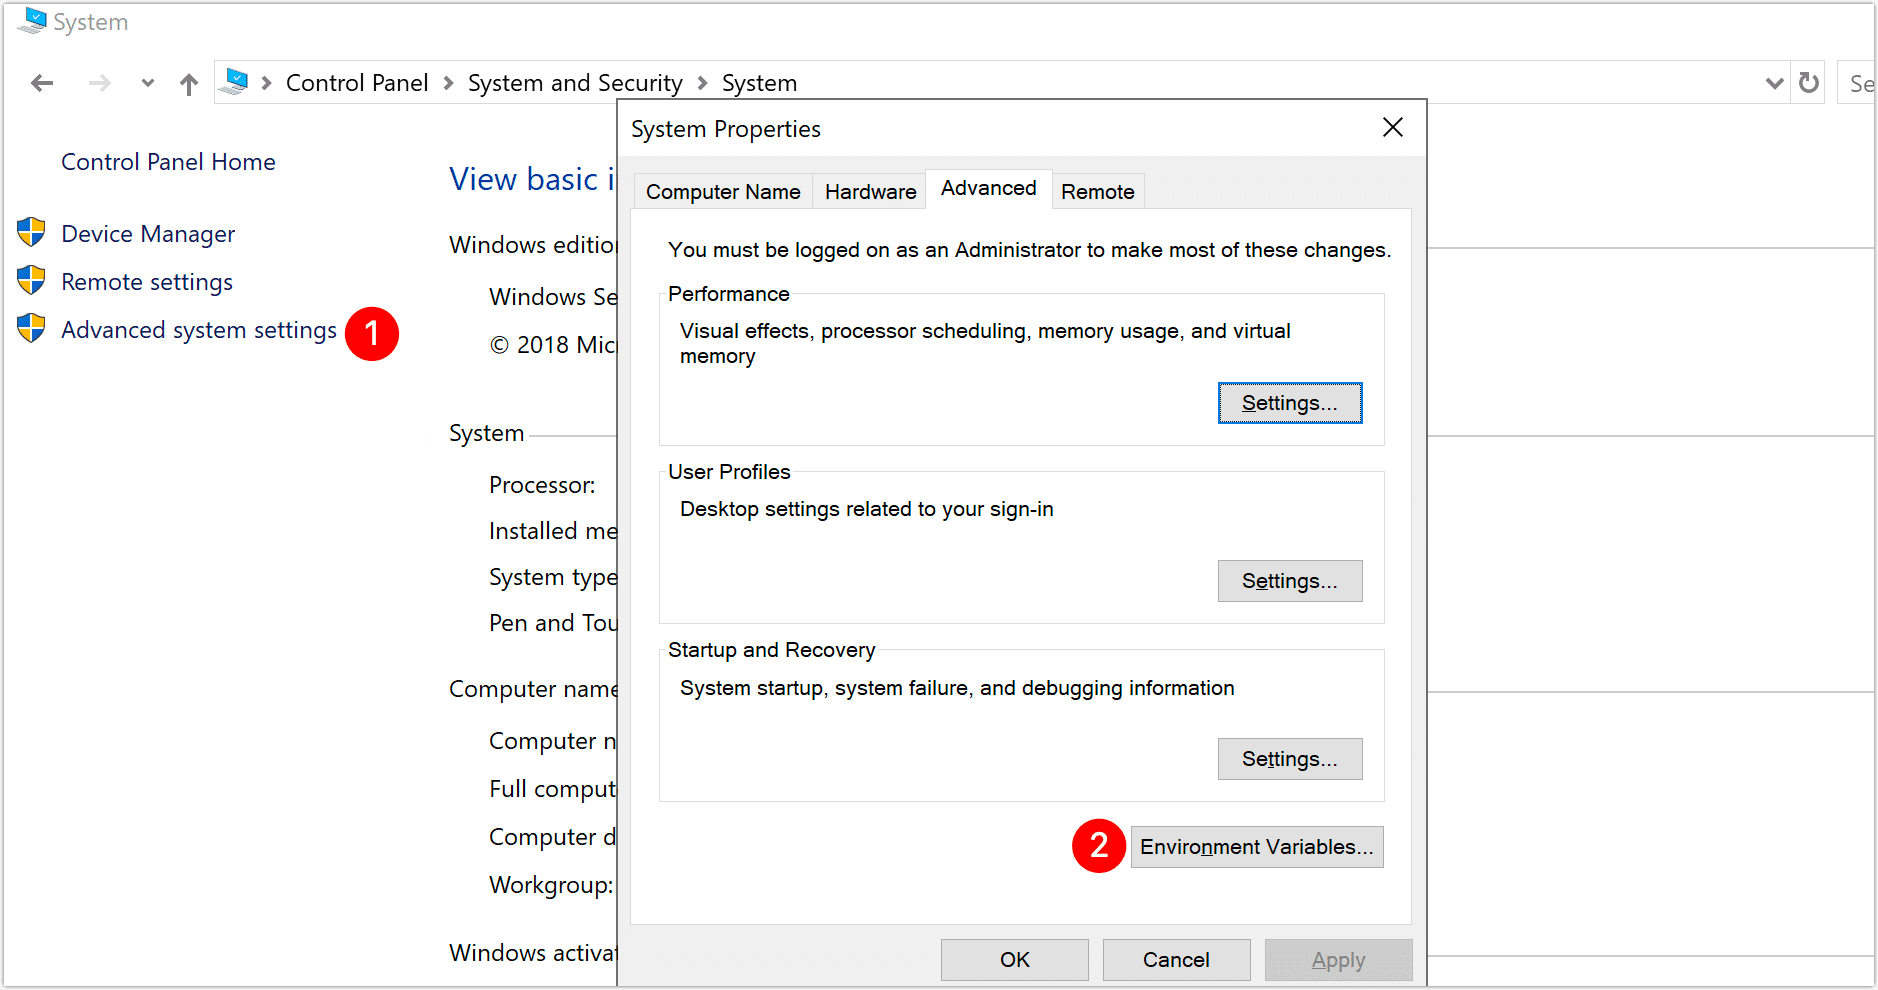
In the dialog that appears, click New under System Variables, fill in the variable name and value, and click OK.

- Variable Name:
JAVA_HOME - Variable Value: The installation path of JDK, for example,
C:\Program Files\Java\jdk1.8.0_202
- Variable Name:
In the System Variables area, find and double-click the Path variable, then in the dialog that appears, add the following environment variables, and click OK.

%JAVA_HOME%\bin%JAVA_HOME%\jre\bin
Following step 4, continue to add a system variable with the name and value as follows, then click OK after completing the setup.
- Variable Name:
CLASSPATH - Variable Value:
.;%JAVA_HOME%\lib;%JAVA_HOME%\lib\dt.jar;%JAVA_HOME%\lib\tools.jar
- Variable Name:
(Optional) Open the command line, execute
java -versionto verify the effectiveness of the environment variable. Successful execution example:java version "1.8.0_202"
Java(TM) SE Runtime Environment (build 1.8.0_202-b08)
Java HotSpot(TM) 64-Bit Server VM (build 25.202-b08, mixed mode)
Procedure
This example uses Windows Server 2019 to demonstrate the deployment process.
Download the TapData installation package (you can contact us to obtain it) and unzip the package to the desired directory.
Open the command line, navigate to the unzipped directory by executing the following command, in this example,
D:\tapdata.cd /d D:\tapdataPrepare the License file.
Execute the following command to obtain the SID information required for the application.
java -cp components/tm.jar -Dloader.main=com.tapdata.tm.license.util.SidGenerator org.springframework.boot.loader.PropertiesLauncherProvide the printed SID information to the TapData support team to complete the License application process.
Upload the obtained License file to the unzipped directory.
Execute
./tapdata.exe startand follow the command line prompts to set TapData's login address, API service port, MongoDB connection information, etc. Example and explanations are as follows:./tapdata.exe start
_______ _____ _____ _______
|__ __|/\ | __ \| __ \ /\|__ __|/\
| | / \ | |__) | | | | / \ | | / \
| | / /\ \ | ___/| | |/ /\ \ | | / /\ \
| |/ ____ \| | | |__| / ____ \| |/ ____ \
|_/_/ \_\_| |_____/_/ \_\_/_/ \_\
WORK DIR:/root/tapdata
Init tapdata...
✔ Please enter backend url, comma-separated list. e.g.:http://127.0.0.1:3030/ (Default: http://127.0.0.1:3030/): …
✔ Please enter tapdata port. (Default: 3030): …
✔ Please enter API server port. (Default: 3080): …
✔ Does MongoDB require username/password?(y/n): … no
✔ Does MongoDB require TLS/SSL?(y/n): … no
✔ Please enter MongoDB host, port, database name(Default: 127.0.0.1:27017/tapdata): …
✔ Does API Server response error code?(y/n): … yes
MongoDB URI: mongodb://127.0.0.1:27017/tapdata
MongoDB connection command: mongo mongodb://127.0.0.1:27017/tapdata
System initialized. To start TapData, run: tapdata start
WORK DIR:/root/tapdata
Testing JDK...
Java version:1.8
Java environment OK.
Unpack the files...
Restart TapDataAgent ...:
TapDataAgent starting ...:- Please enter backend url: Set the login address for the TapData platform, default is
http://127.0.0.1:3030/. - Please enter tapdata port: Set the login port for the TapData platform, default is
3030. - Please enter API server port: Set the service port for the API Server, default is
3080. - Does MongoDB require username/password?: If MongoDB database has enabled security authentication, enter y then follow prompts to enter username, password, and the authentication database (default is
admin). - Does MongoDB require TLS/SSL?(y/n): If MongoDB database has enabled TSL/SSL encryption, enter y then follow prompts to enter the absolute path of the CA certificate and Certificate Key file, and the file password of the Certificate Key.
- Please enter MongoDB host, port, database name: Set the URI connection information for the MongoDB database, default is
127.0.0.1:27017/tapdata. - Does API Server response error code?: Whether to enable API Server response error code function.
After successful deployment, the command line returns the following example:
deployed connector.
Waiting for the flow engine to start \
FlowEngine is startup at : 2023-04-01 23:00
API service started- Please enter backend url: Set the login address for the TapData platform, default is
Log in to the TapData platform through a browser. The local login address is http://127.0.0.1:3030. Please change the password promptly after the first login to ensure security.
tipTo access the TapData service from other devices on the same internal network, ensure the network is intercommunicable, for example, setting Windows Firewall to allow access to ports 3030 and 3080 on the local machine.